
A tour of the plan builder
Find your way around the QuickCoach plan builder, from creating a plan and adding tasks to headings, supersets, ad-hoc exercises, drafts and publishing.

The plan builder is where you create plans for your clients. They can be workout plans, nutrition plans, habits, or basic forms. Your plan builder is as creative as you are.
Watch the plan builder video walkthrough. If you'd rather build something real as you learn, follow the build-along guide to your first program template.
Note: QuickCoach's features and screen layouts may change over time, but the core workflow stays the same.
Where you can create plans
You can build a plan from several places: the home page, a client's account, Plan Drafts, or inside a Program Template. The walkthrough below builds a plan inside a Program Template, but the plan builder works the same everywhere unless noted.
Start a new plan
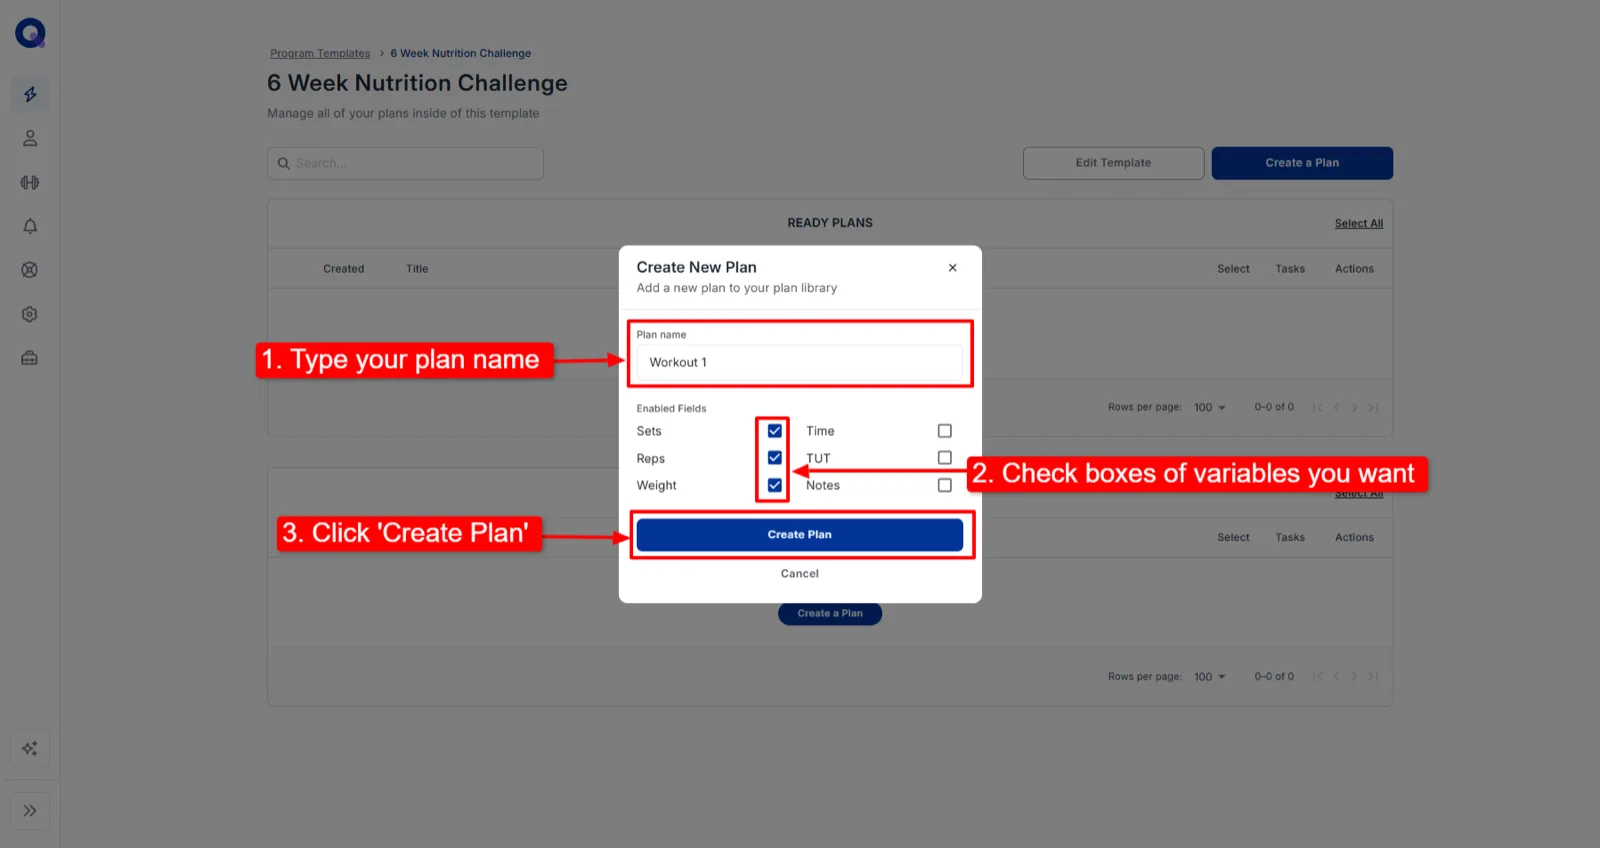
Click 'Create a plan'. Then name your plan and tick the boxes for the variables you want to include. Click 'Create Plan' when you're done.
This is your plan builder. You can change the plan's name at any time in the 'Plan name' text box.
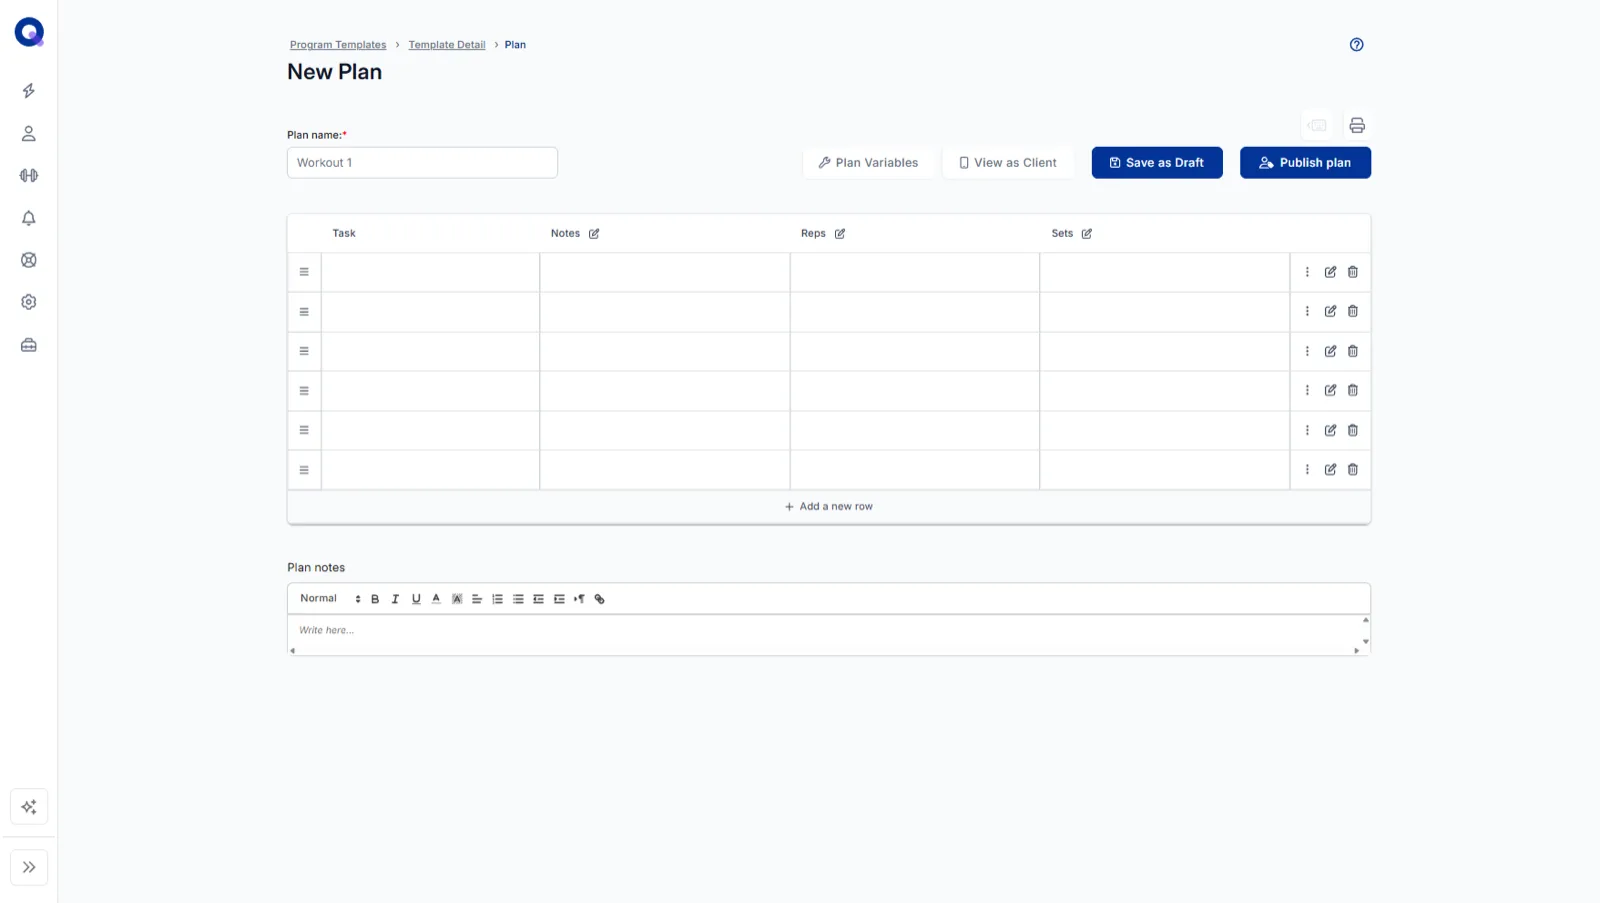
Variables
Variables are the names of the editable columns, and a plan can have up to six of them. You chose your variables when you created the plan, but you can change them from inside the builder in two ways.
Option 1: Click 'Plan Variables' to open the Plan Variables menu. Rename any variable by changing its text, use the toggles to enable or disable variables, then click 'Apply Changes'.
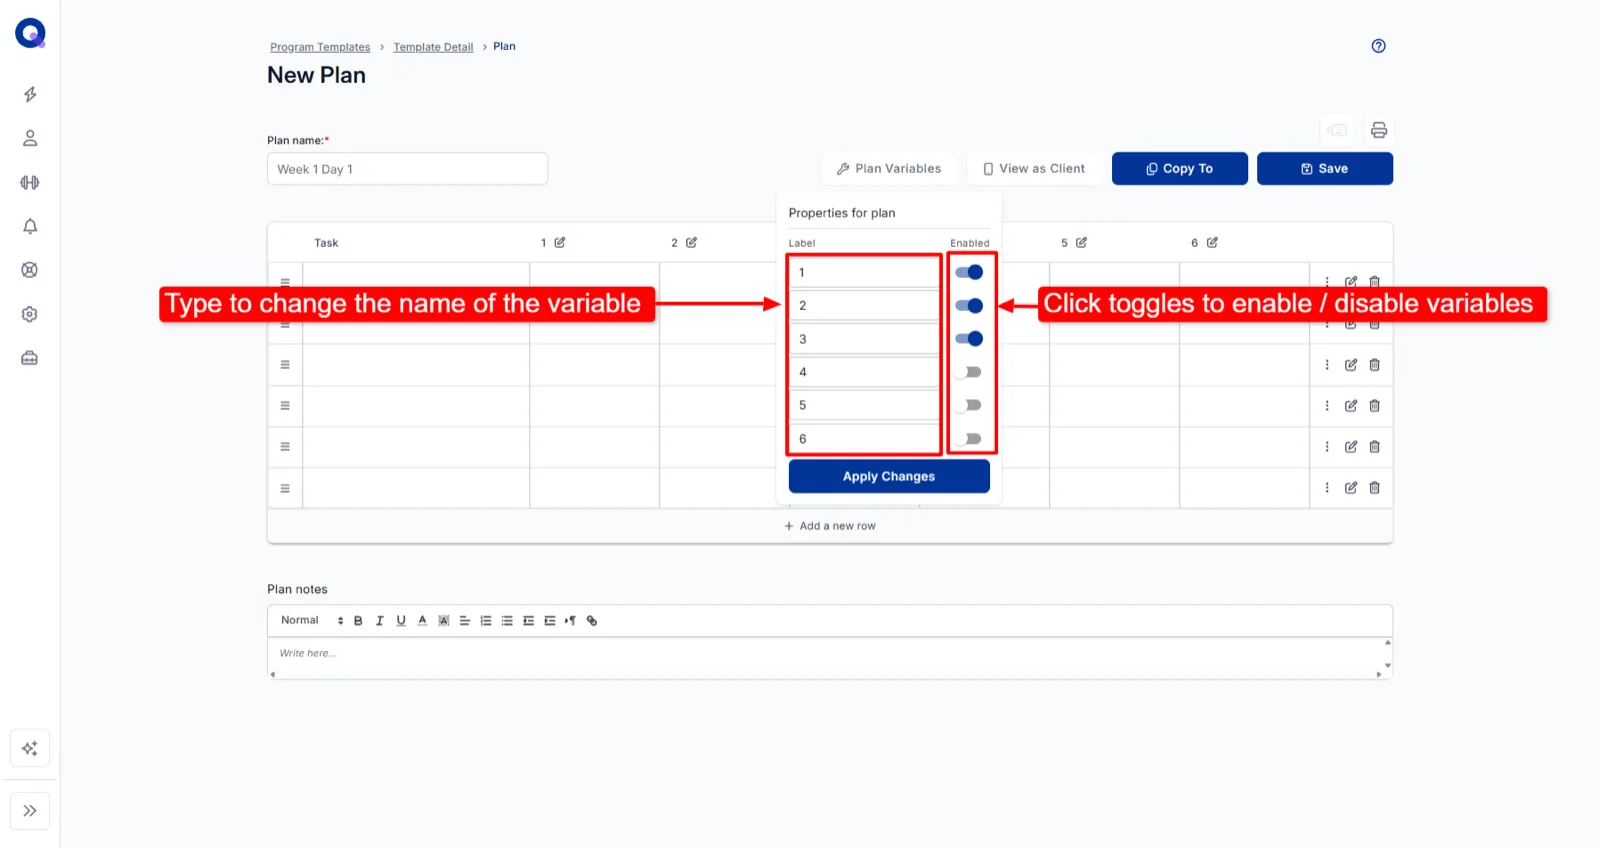
Option 2: Click a column heading, type in the 'Label' text box to rename it, then click 'Apply Changes'. The same panel has a toggle to disable the variable.
Tip: In the Plan Variables menu the labels run top to bottom, which shows left to right on the plan itself. Enter them in the order you want them to appear.
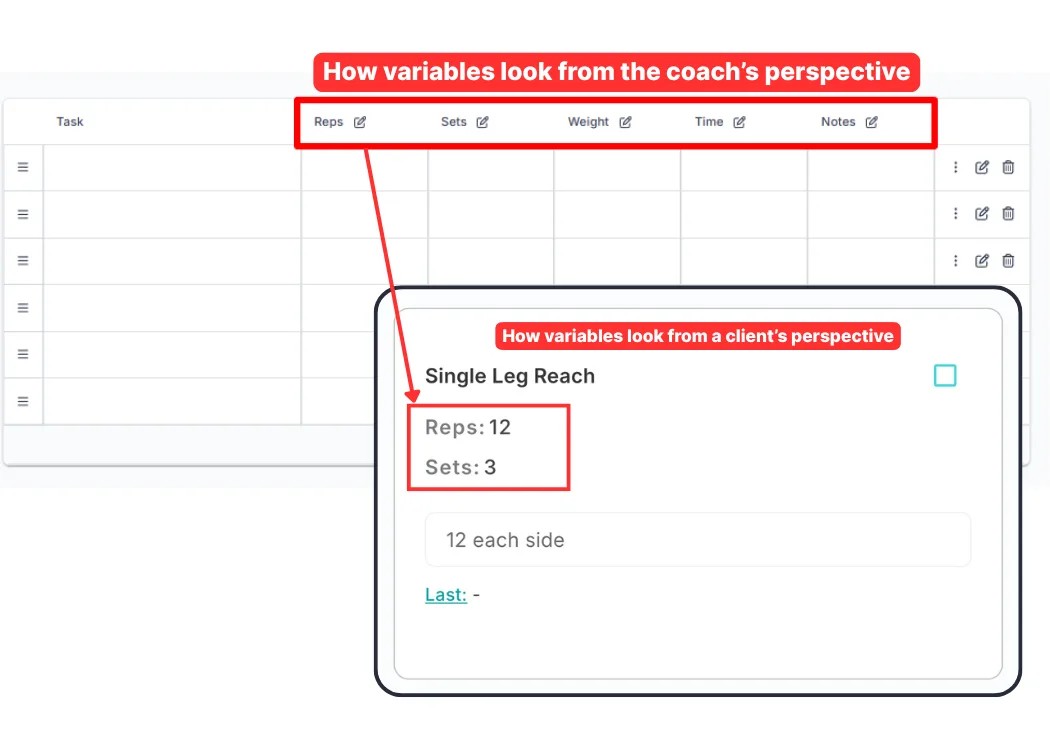
Variables look different for your clients than they do for you. Here's the client's view of a task with variables:
Add a new task
Type the name of your task into any cell in the 'Task' column. Click 'Add (name of task) to your library' to add it to your Task Library, or click anywhere else to keep it out of the library.
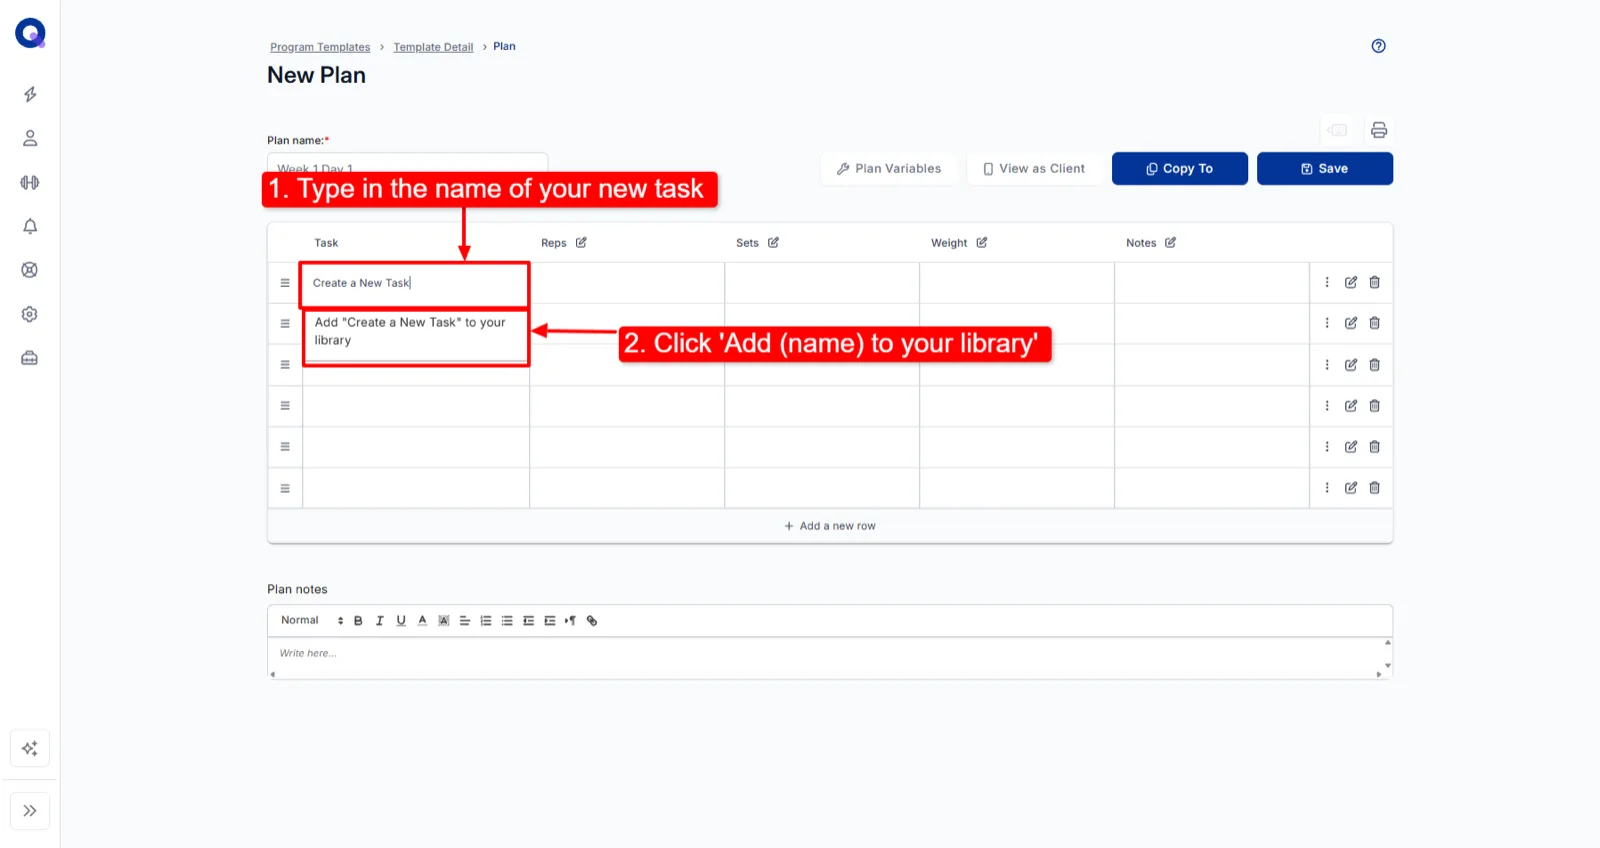
Important: Add a task to your library when you'll want to reuse it and track a client's history for it. That's the vast majority of tasks, so when in doubt, add it.
Click the edit icon to open the task and add details: task notes, a video, and, on Pro, images or an audio note.
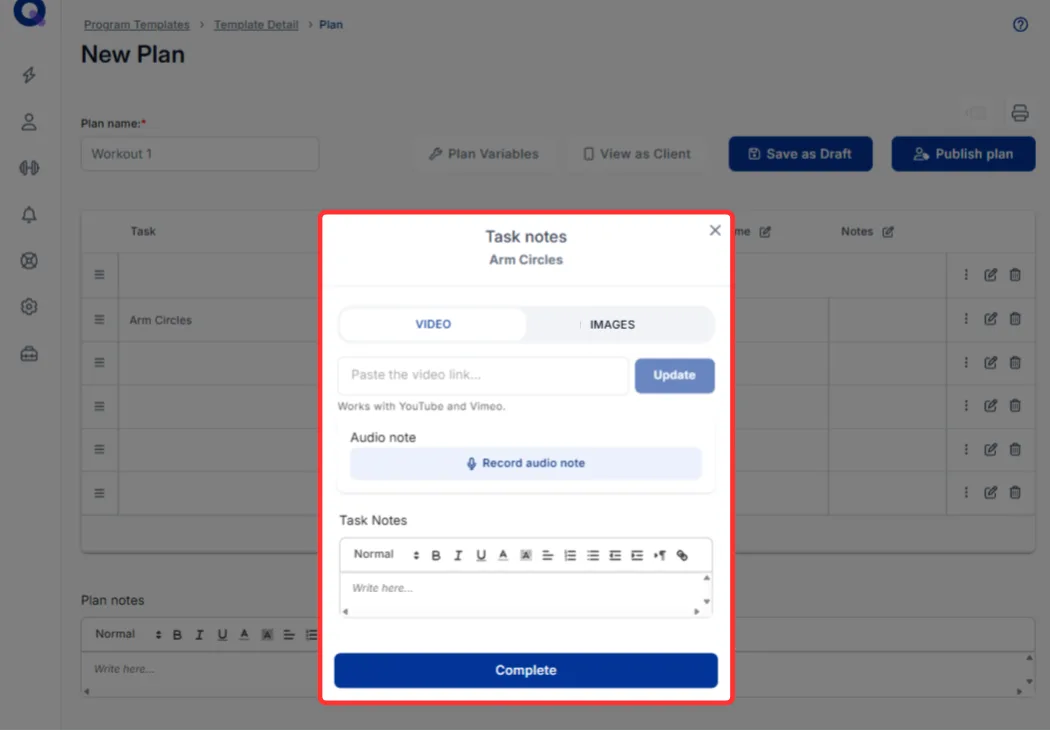
Golden rule: Build your tasks in full as you go. If you add a task to a plan and change the task later, plans that already use it won't update. Changes only apply going forward.
To add a video, copy and paste a link from YouTube or Vimeo into the video text box and click 'Update'. The video thumbnail appears once it's saved. Then add your task notes.
To add images, click 'Images', then 'Add Image', then 'Browse', and double click the image you want. Image attachments are a Pro feature, and you can add up to three images per task. Each image has three buttons: one to replace it, one to delete it, and one to magnify it.
To record an audio note, click 'Record audio note', then click the button again to stop (a note can run for up to 60 seconds). Audio notes are part of Pro; Free accounts created under the current Free plan rules see them locked. A note you record here stays on this plan only. Unlike notes, video and images, it isn't saved back to your Task Library, so it's the place for client-specific messages. Click 'Complete' when you're done editing the task. There's more detail on every medium in adding media to tasks.
Back in the builder, a task can carry small icons showing it has a video, text notes, an audio note, or images, plus a book icon showing it's in your task library. Click any icon to open that detail and view or edit it.
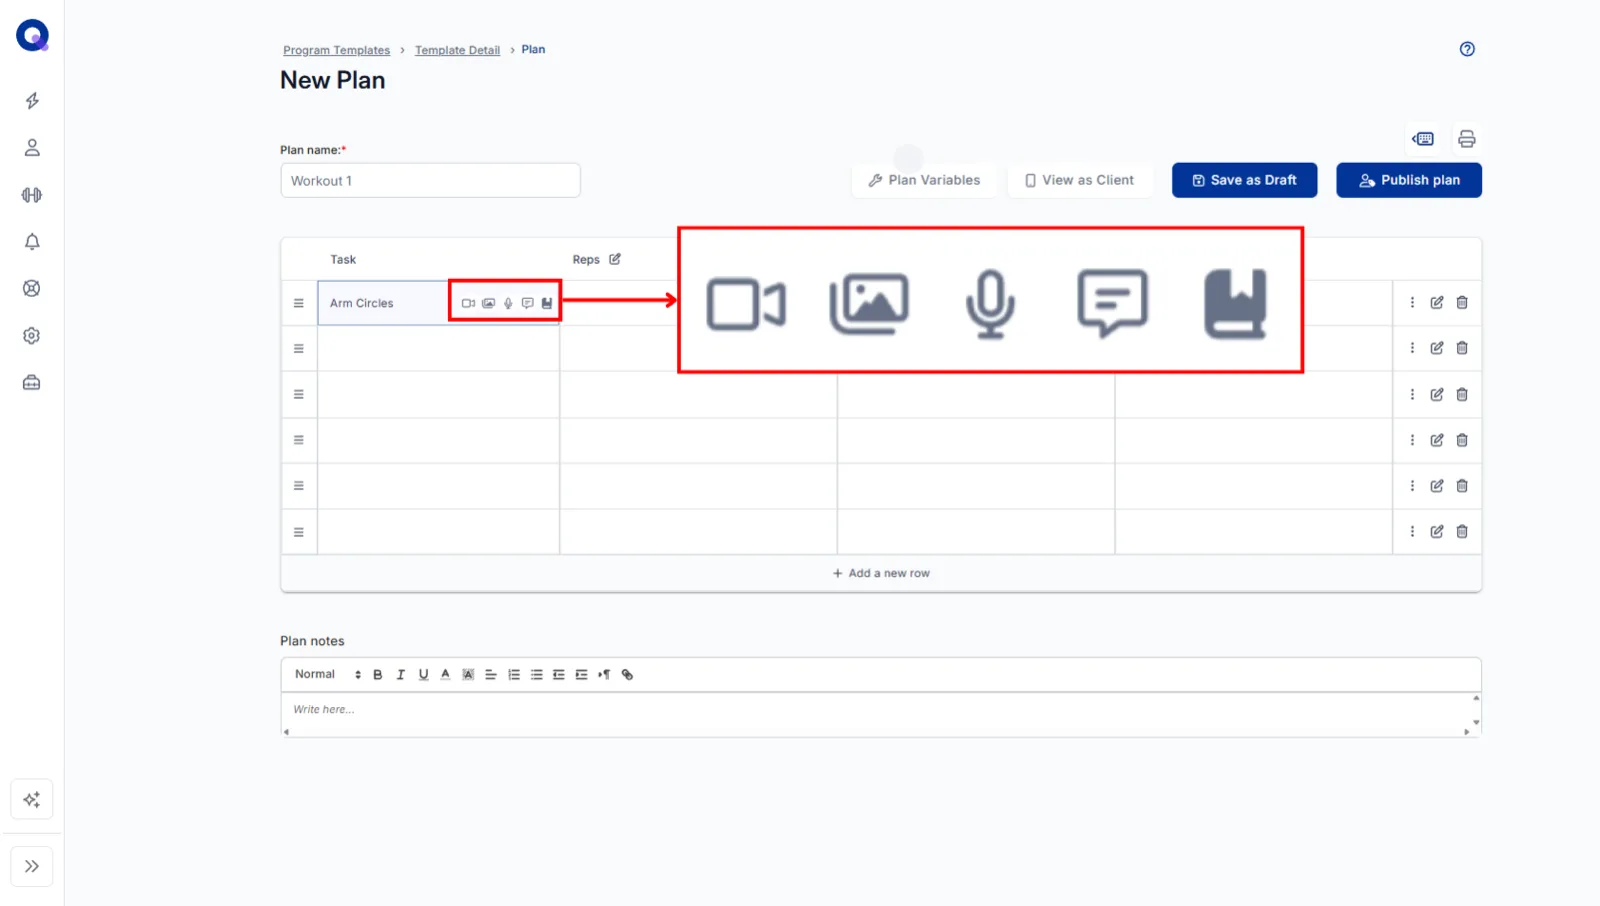
The book icon matters most. It shows the task is in your library, which means your client's history is being tracked. If you're building inside a client's account, click it to see all of their history for that task. Handy when you need their previous results to set this week's targets.
Add an existing task
Type the name, or part of the name, of a task from your Task Library into any cell in the 'Task' column. Then click the task you want in the search results to add it to your plan.
Ad-hoc exercises your client adds (Pro)
Your library covers the vast majority of what you program, but sessions don't always go to plan. Ad-hoc exercises cover the gap from the client's side: there's no ad-hoc option in the plan builder itself. If you need a movement that isn't in your library, type its name into the 'Task' column as a new task, as described above.
On Pro, while a plan is still pending, your client can tap 'Add Exercise' at the bottom of it in their app. They name the movement, fill in the plan's enabled columns, and it's added to the plan as a completed task labelled 'Added by you' (it shows as 'Client added' when you preview the plan from your side), so a session that grows beyond what you wrote still ends up tracked in full. Ad-hoc exercises don't feed your task history the way library tasks do. On the Free plan the button is locked and the client sees a 'this feature is locked by your coach' message instead. Nothing in your settings causes that message; it's the plan limit, and upgrading to Pro turns the button on for every client on your roster.
Reach for your library first where you can, since exercises imported from the QuickCoach Exercise Library come with demonstration videos.
Fill in variable details
In the cells, fill in the details relevant to each task. A warm-up row might tell the client to do one set of arm circles for 30 seconds in each direction.
Create a heading
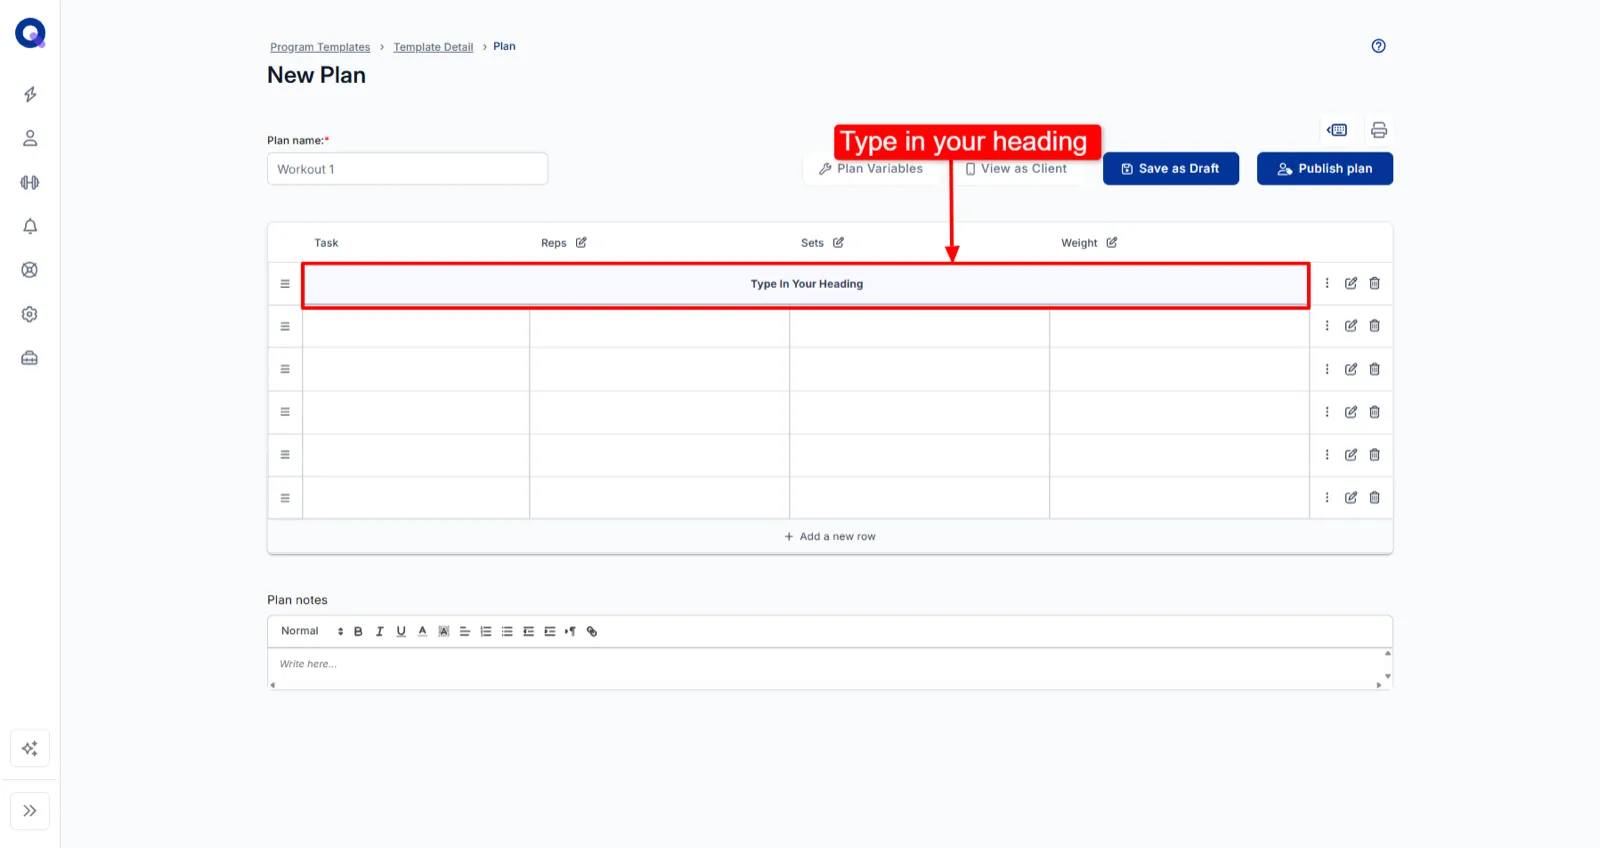
A heading creates a separate section in your client's plan, such as "Warm-up" or "Main lift". Click the three-dot 'Options' menu on a row, then click 'Create Heading', and type your heading into the merged row. 'Revert to Row' turns it back into a normal row.
Create a superset
Supersets group tasks together. Click the three-dot 'Options' menu on any row and click 'Create Superset'. If the row already has a task, that task is included in the superset.
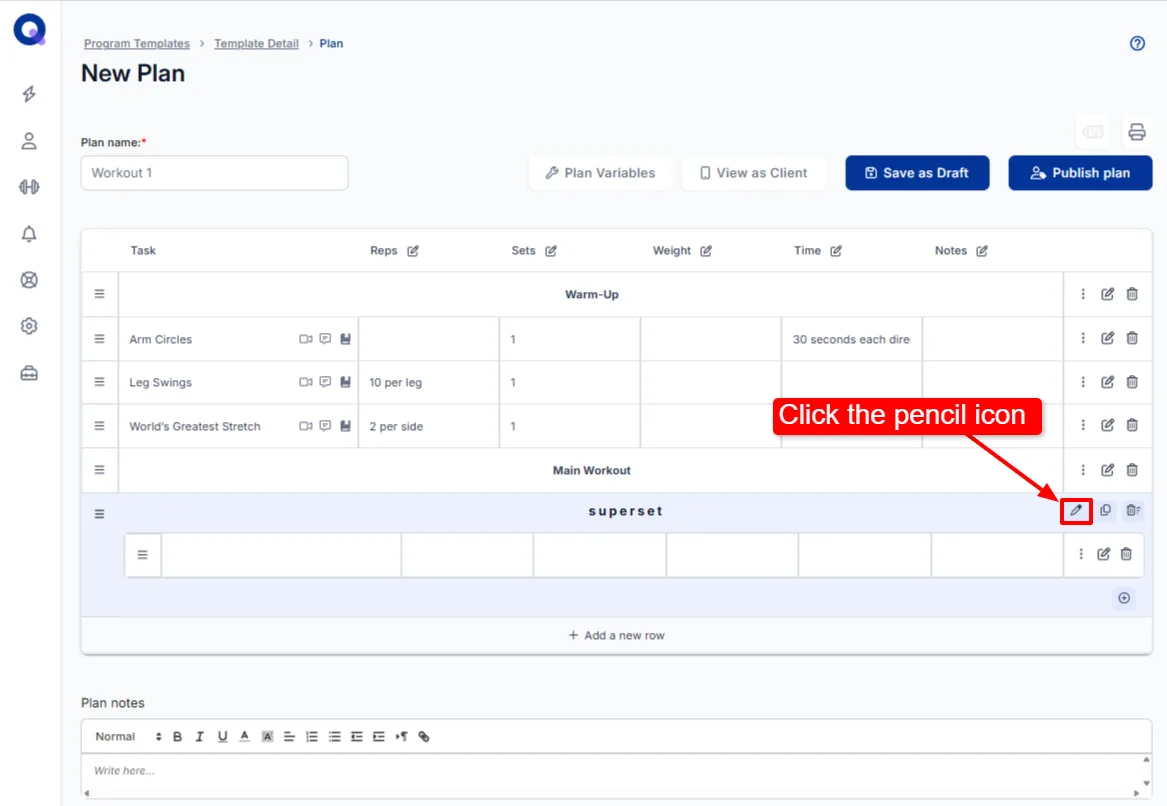
Using headings and supersets covers both features in depth, including what your client sees. The icons on a superset (Edit Name, Copy Superset, Delete Superset and Add New Row) are listed in plan builder shortcuts and settings.
Add a new row
This one's easy. Click '+ Add a new row' at the bottom of the plan.
Add plan notes
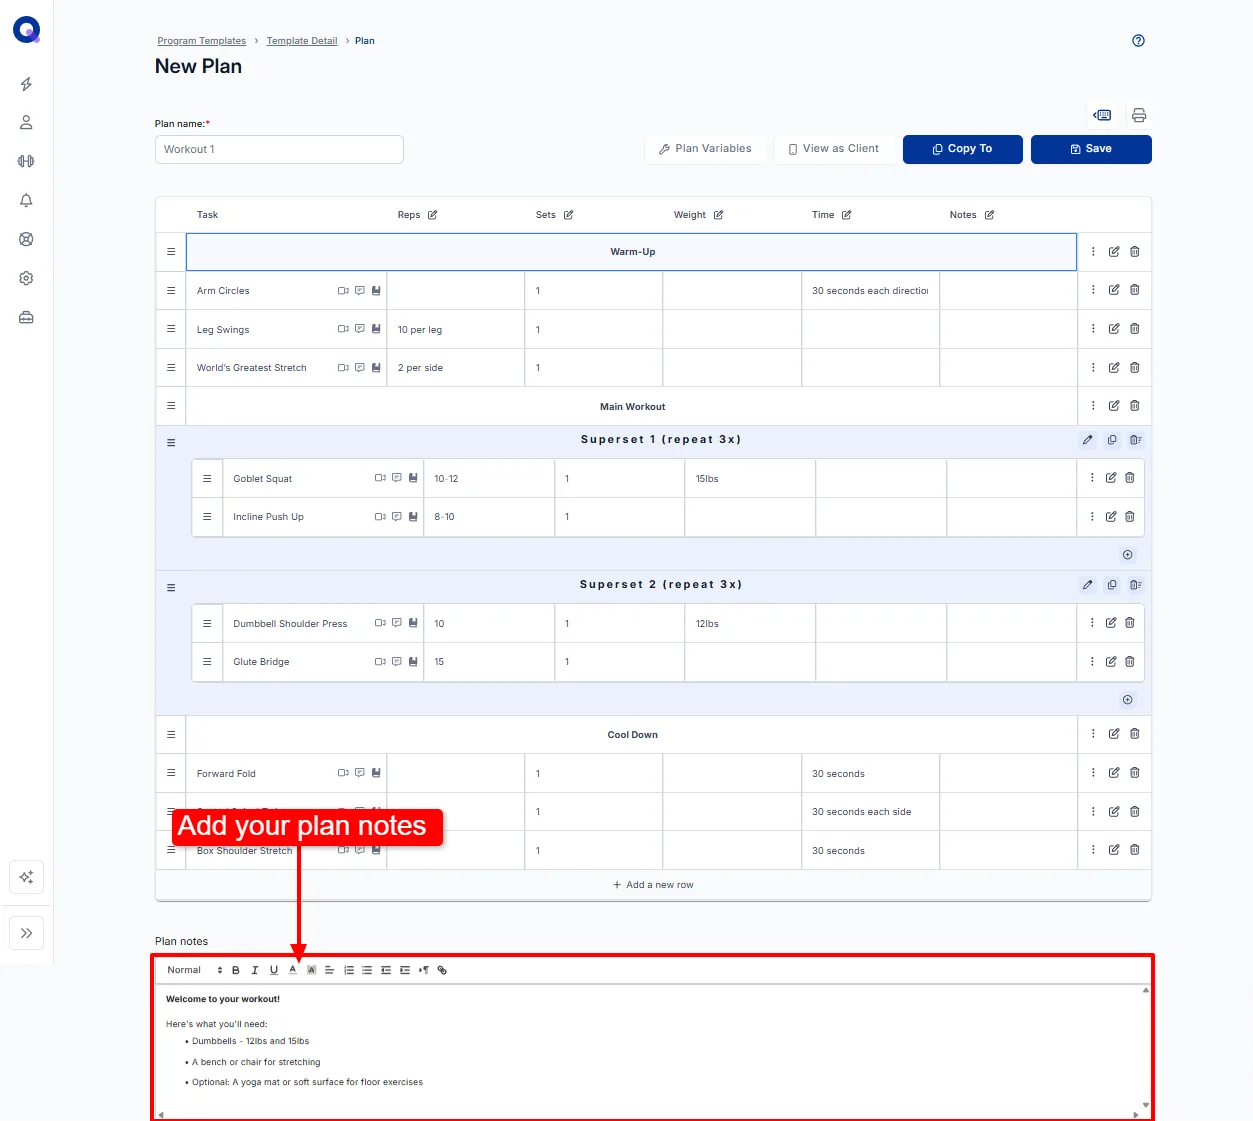
Plan notes show up at the top of a client's plan. They're your chance to share anything the client should know before they start.
Move rows

Click and hold the three lines on a row to drag it into a new position. The same handle moves a whole superset.
See the client's perspective
Click 'View as Client' to see exactly what your plan looks like on your client's side. Click the X to close the preview and go back to building.
Save a plan as a draft
QuickCoach saves your work automatically as you build. If you want to leave a plan and come back to it, click 'Save as Draft'. Where the draft lands depends on where you created the plan.
- Program Template: the plan goes to the template's 'Draft Plans' section.
- Client's account: the plan goes to their 'Drafts' tab.
- Plan Drafts: the plan stays in Plan Drafts until you publish it.
Publish a plan
Click 'Publish plan' at the top right of the page. What happens next also depends on where you built the plan. In a Program Template, the published plan appears under the template's 'Ready' plans. In a client's account, it shows up at the bottom of the list in the 'Upcoming (Published)' tab. Every route is covered in assigning plans to clients.
Frequently asked questions
Can I make a plan reusable?
No. Each plan is done once it's submitted, so make copies of a plan for however many times you want it repeated. See copying, duplicating and repeating plans for the quick way to do this.
Can I copy a client's plan for another client or a program template?
Yep. The 'Copy To' button handles it; making copies of plans has the walkthrough.
Can I use plans to create forms?
Of course. If you want to track the answers over time, add each question to your task library. If you don't need answers tracked, add the task to the plan without adding it to the library. Check-ins, forms and measurements has the full walkthrough.
Can I view the plan as my client?
You can. 'View as Client' shows the plan itself, and you can also see a client's whole account from their perspective.
How can I schedule my client's plans?
QuickCoach works on a what-comes-next basis. Clients don't reschedule anything when life gets busy; they open the app and do whatever is next. If you want more structure, build it into your plan names: Week 1 Day 1, Week 1 Day 2, Week 1 Day 3, and so on. How clients see their plans explains the client side of this.
Is there an easier way to pull history while I build?
There is. Build the plan inside your client's account, then click the book icon on any library task. A pop-up shows that client's history data for the task. For what history tracks and how to read it, see seeing a client's history.
Why aren't my task notes, video or images showing in my plan?
You most likely added the task to the plan first and filled in the details later. Details don't apply to past uses of a task, only future ones. Edit the plan and reselect the task and the details will appear. Best practice is to finish a task's details before adding it to plans.
I can't find my plan. Where did it go?
First, don't panic. Nothing disappears on its own, and as long as you had an internet connection, QuickCoach saved everything as you went. The usual cause is that it's sitting somewhere other than where you're looking: a draft in the client's 'Drafts' tab rather than 'Upcoming (Published)', a draft in a Program Template's 'Draft Plans' section, or a plan in 'Plan Drafts'. On the client's side, a finished plan sits in their collapsed Completed Plans list, which shows six at a time. The full checklist is in the Program Templates and Plan Drafts guide.
How can I use supersets?
Supersets are simply a way to group tasks, so they're not limited to their traditional gym use. Give clients choices, like a superset called "Squat" holding three squat variations to pick from, or progression and regression options. Or group tasks by category: "Habits For Today" holding the day's habits, or "Breakfast Macros" where each task is a macro to track. That's not an exhaustive list, but it shows what's possible.
Are plans meant to be daily, weekly, or something else?
Any of those. Most coaches use a plan as a daily workout, or whatever they want the client to do that day. Some coaches run weekly plans, which means fewer plans to manage for both sides. The downside: if a client accidentally submits a plan, it can't be reopened. You'd need to copy the completed plan, strip out what they'd already done, and publish the copy so they can finish it.
Once the basics feel familiar, plan builder shortcuts and settings covers default columns, keyboard building and the quickest menus.