
A tour of an individual client's account
Tour a client's individual account, covering their link, notes, history, plans in every status, and the feedback they leave you.

Each client has their own account page, and it's where most of your day-to-day coaching happens. This tour works through it top to bottom.
To open one, click 'Clients' to go to your roster, then click the client's name or the edit icon on their row.
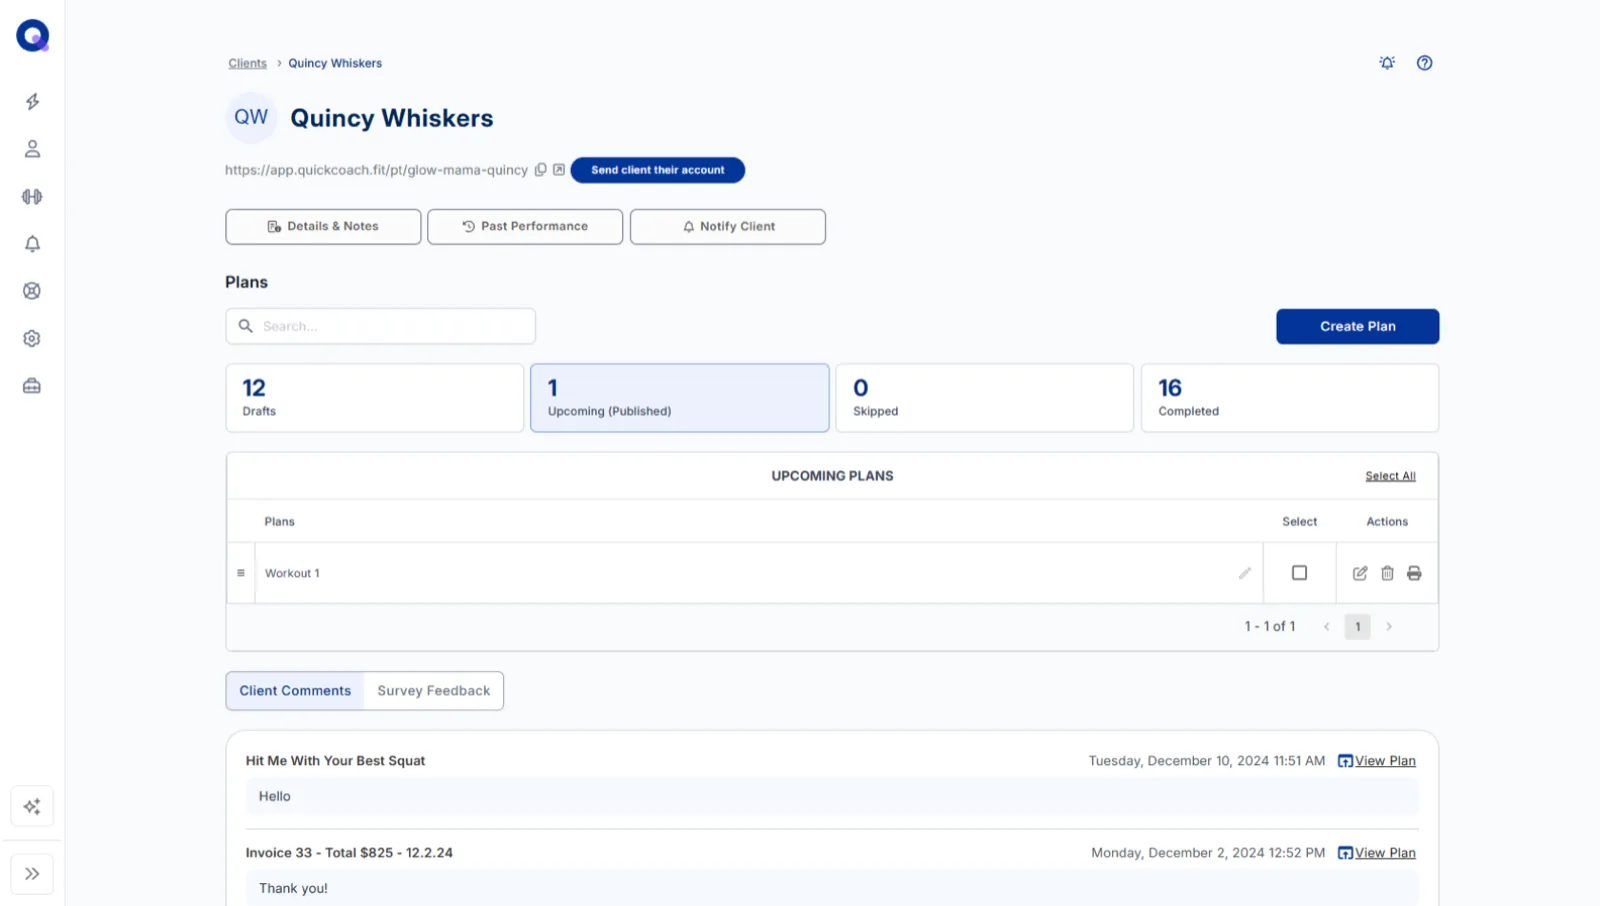
Send your client their account
Clients access their account through a link they open in their browser. There are no usernames or passwords, just the link. You can get it to them in two ways.
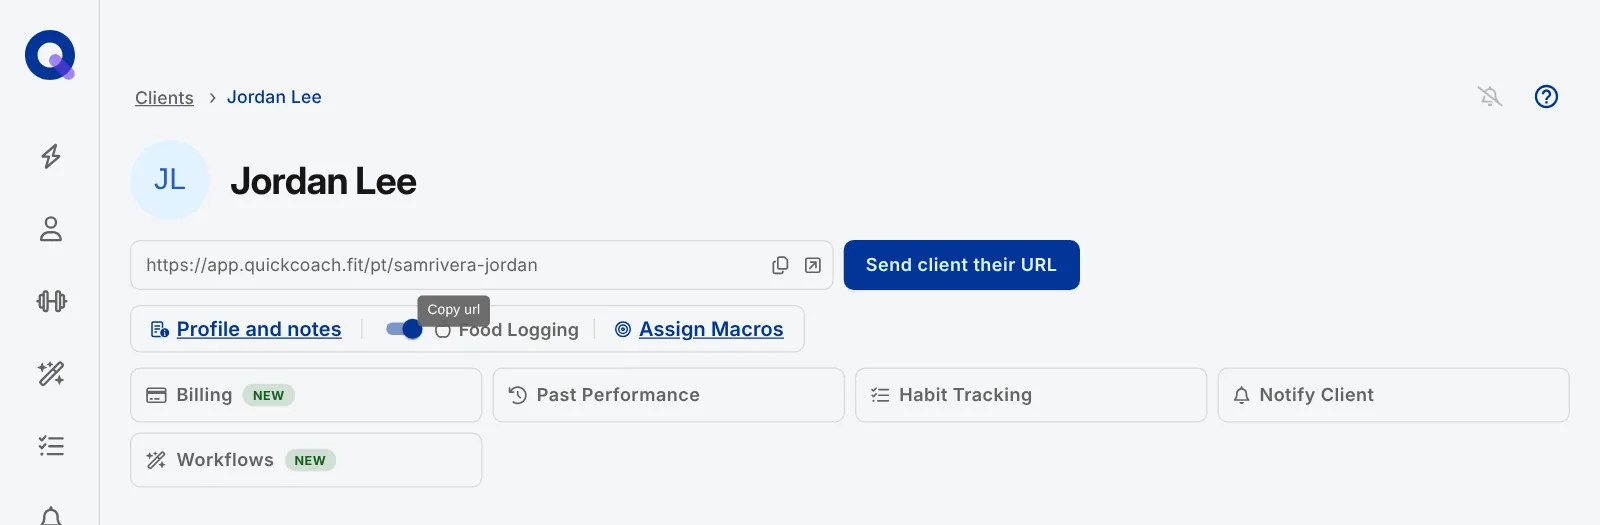
Option 1: send it via QuickCoach. Click the 'Send client their URL' button beside the link box and QuickCoach emails them their welcome email.
Note: If you didn't add an email address when you created the client, you'll be prompted to add one when you click the button.
On Pro, the welcome email follows your custom app branding, and you can replace its body text, support line and sign-off. On the free plan it arrives with QuickCoach's default look and wording. If the built-in text isn't for you, copy the link and send it your own way. See what the welcome email looks like for clients.
Option 2: send the link yourself. Click the client link or the copy icon next to it, then paste it into a text, WhatsApp, or wherever you talk to your clients. More detail in sending clients their account.
Open your client's view of their account
Click the open icon inside the link box (its tooltip reads 'Open Client App') to open the account exactly as your client sees it. Handy for checking a plan looks right before they do. There's more on this in seeing a client's account from their side.
The controls at the top of the page
Under the link box sits a small row with 'Profile and notes', the 'Food Logging' switch and, once food logging is on, 'Assign Macros'. Below it is a grid of tiles: 'Billing', 'Past Performance', 'Habit Tracking' and 'Notify Client', plus 'Workflows' if you have the Coach Workflows add-on. Each one is covered below.
Update details and add notes
Click 'Profile and notes' to manage the client's information. You can update their first name, last name, phone number, and email address, then click 'Save personal details'.
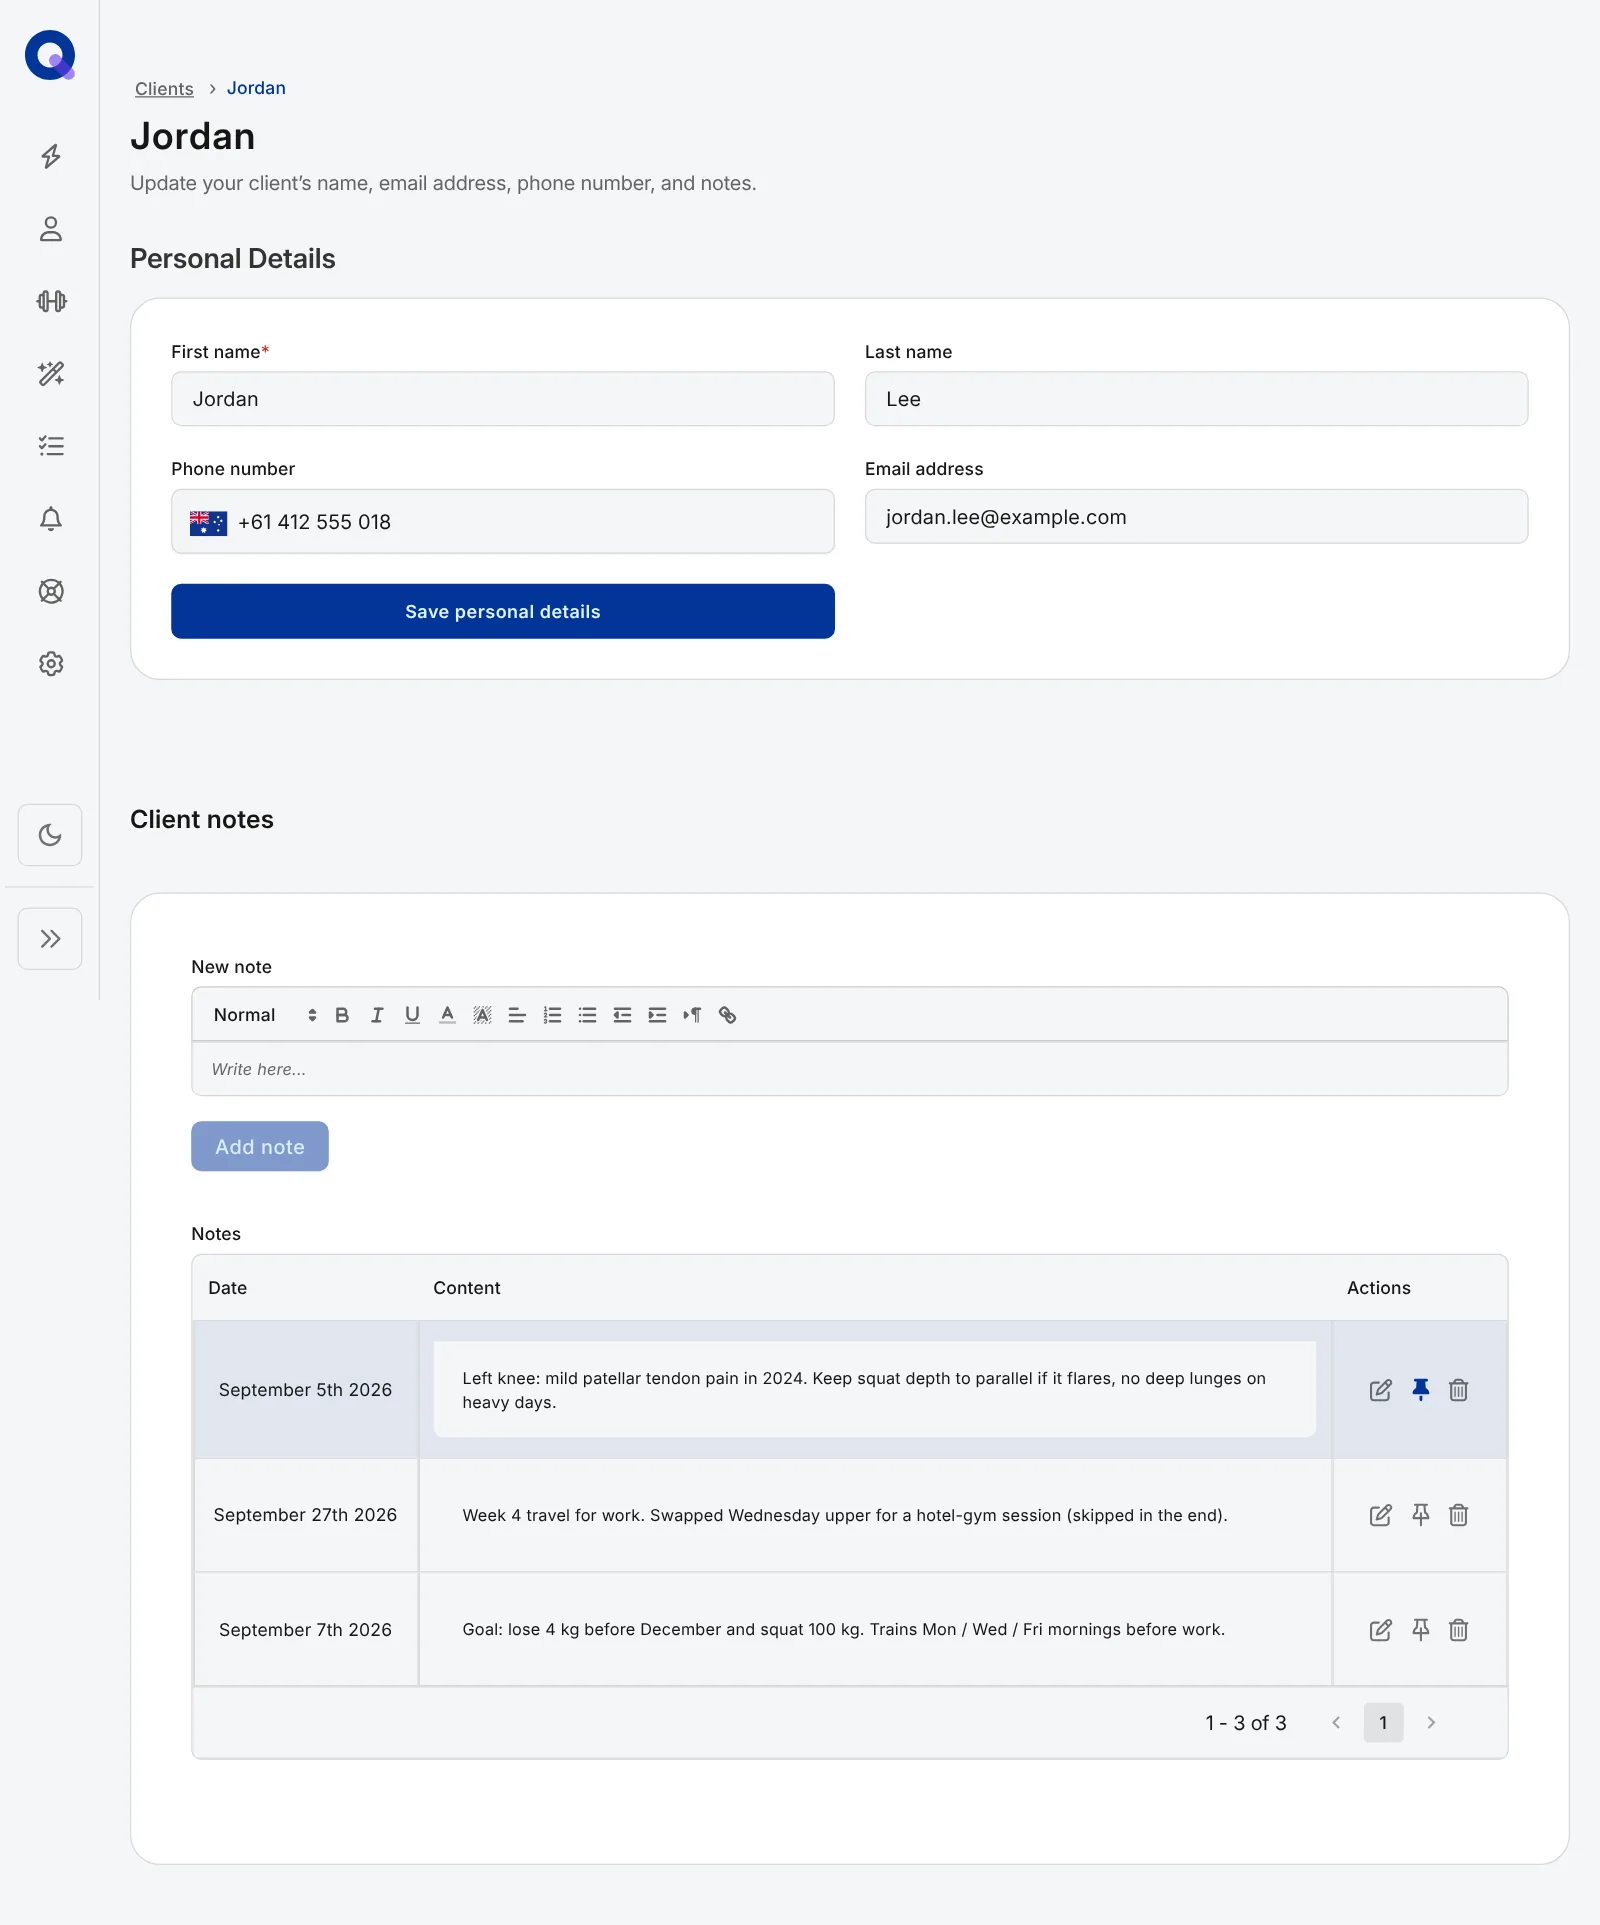
Below the details sit client notes, a for-your-eyes-only space to keep information about the client. Type in the notes box and click 'Add note' to save one.
Each note has an edit icon for changes, a pin icon, and a trash icon to delete it. You can pin up to three notes to the top of the list; pinned notes are highlighted light purple, and clicking the pin again unpins them.
Turn on food logging and assign macros (Pro)
The 'Food Logging' switch lets this client log food from their app. It's off by default for every client, and on Free it's locked with a Pro badge. Once you switch it on, 'Assign Macros' appears beside it so you can set the client's macro targets, which show as the day's targets in their Food Diary. See nutrition in client plans and assigning client macros.
Bill the client
The 'Billing' tile opens this client's billing: charge them by card, one-off or recurring, and see their payments and subscriptions. Client Billing works on any plan once you've connected Stripe. See charging a client.
View past performance
Click 'Past Performance' to see the client's history for every tracked task. The page it opens is titled 'History', with 'Workout History', 'Habit Tracking' and 'Food Logging' tabs. Type in the search box to find a specific task.
The table has three columns. 'Task' names each task the client has data for, 'Last Performed' shows when they last did it, and 'Results' shows the most recent result.
Click the chart icon or the task name to drill into a task. At the top you'll see the 'First' and 'Last' results, each with the plan name, completion date, and what your client typed in the results box. Beneath that sits every result recorded for the task, with its date, the result itself, and the plan it came from.
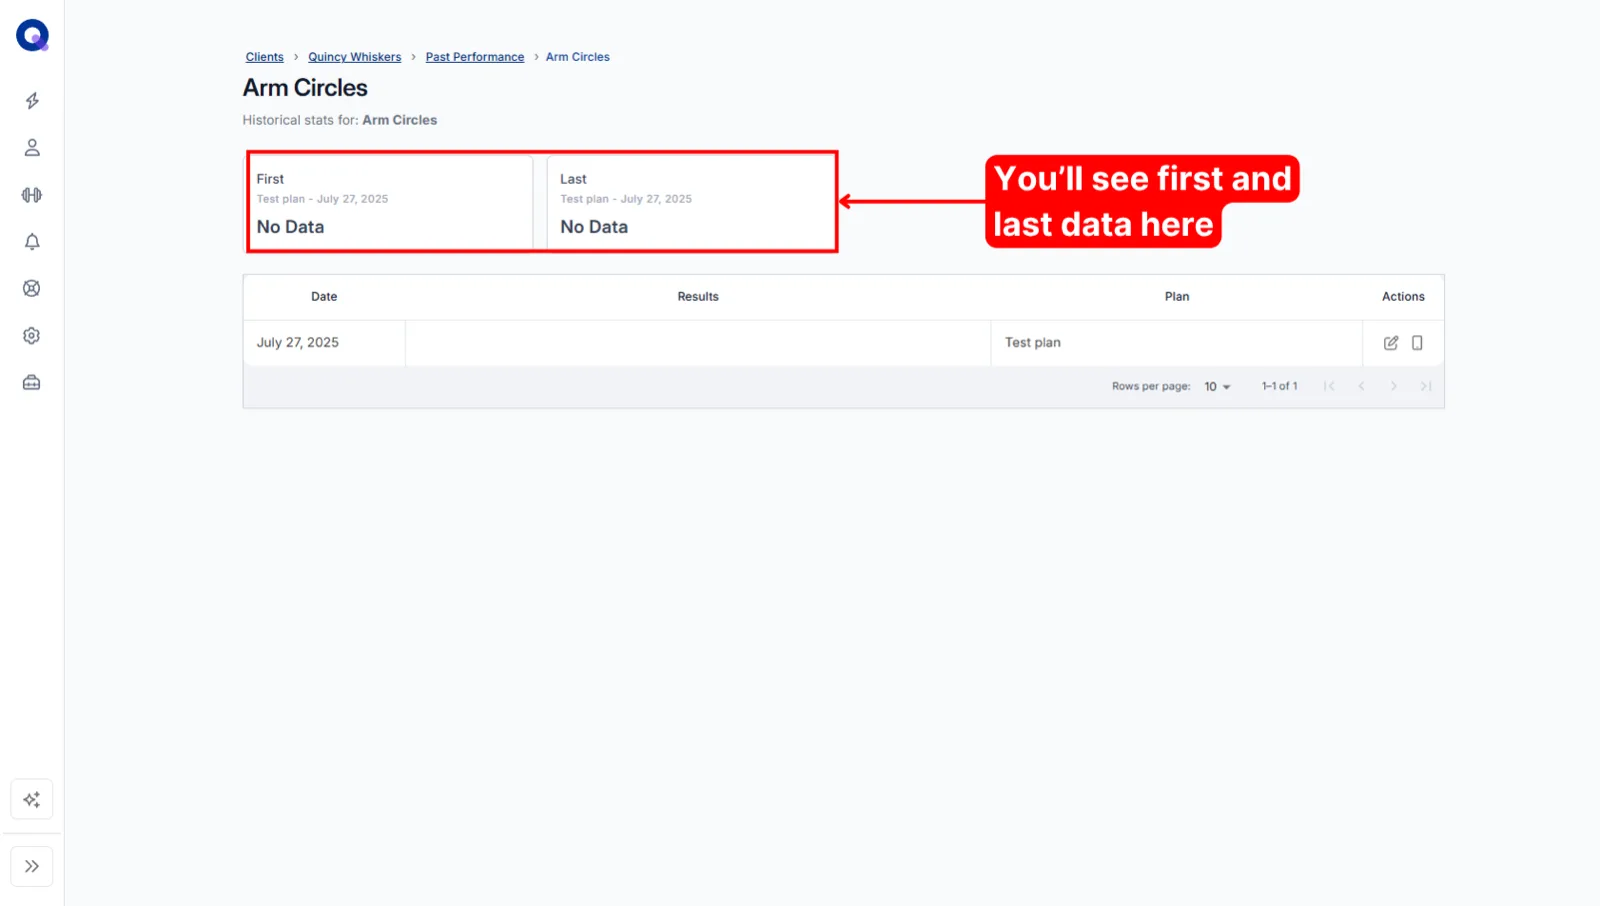
Two extra actions live here. The edit icon under 'Actions' lets you correct a result (change the 'Result' box, then click 'Save'), and the phone icon opens the plan the task was in when it was submitted, which gives the result context. There's more in seeing your client's history.
Manage the client's habits
Click 'Habit Tracking' to open this client's habits page, where you pin the weekly habits they see in their app. On Free, each client can have one active habit with a simple done/not-done check-in; Pro removes the cap and adds rich check-ins. See habit tracking.
Send your client a notification
Click 'Notify Client' to send a custom push notification to this client. It's a Pro feature, so on Free the tile carries a Pro badge and opens the upgrade options instead. The 'Template' dropdown offers 'New Plan Assigned' and 'Plan Updated', or 'Customize' for a one-off message, which is the default.
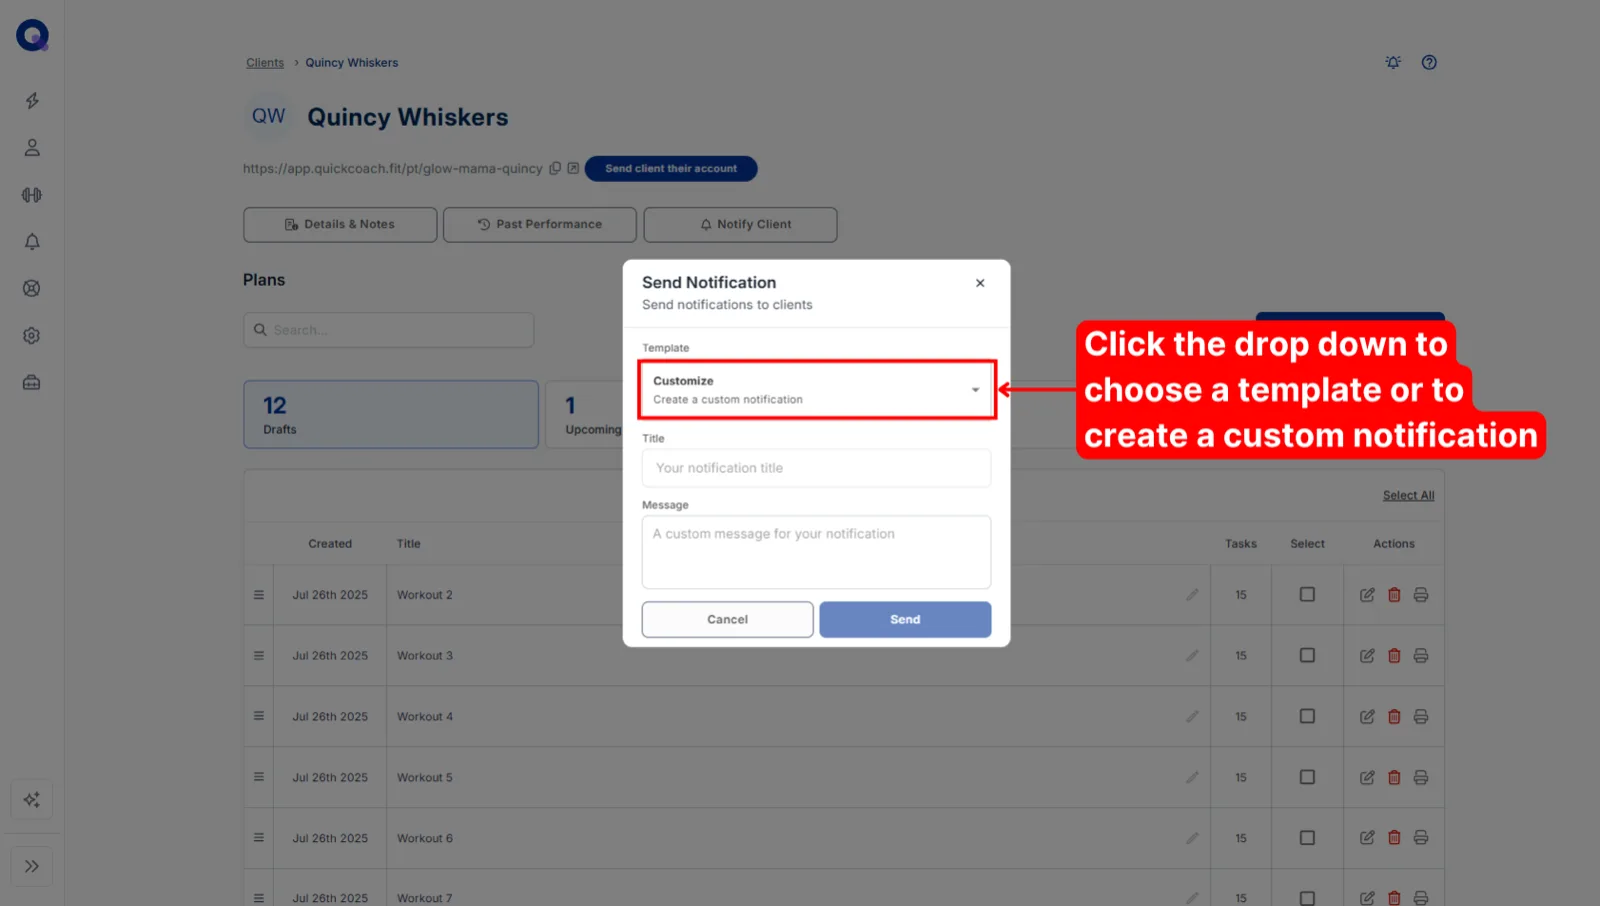
Add a title, write your message, and click 'Send'. On the client's phone the title shows in bold with the message underneath.
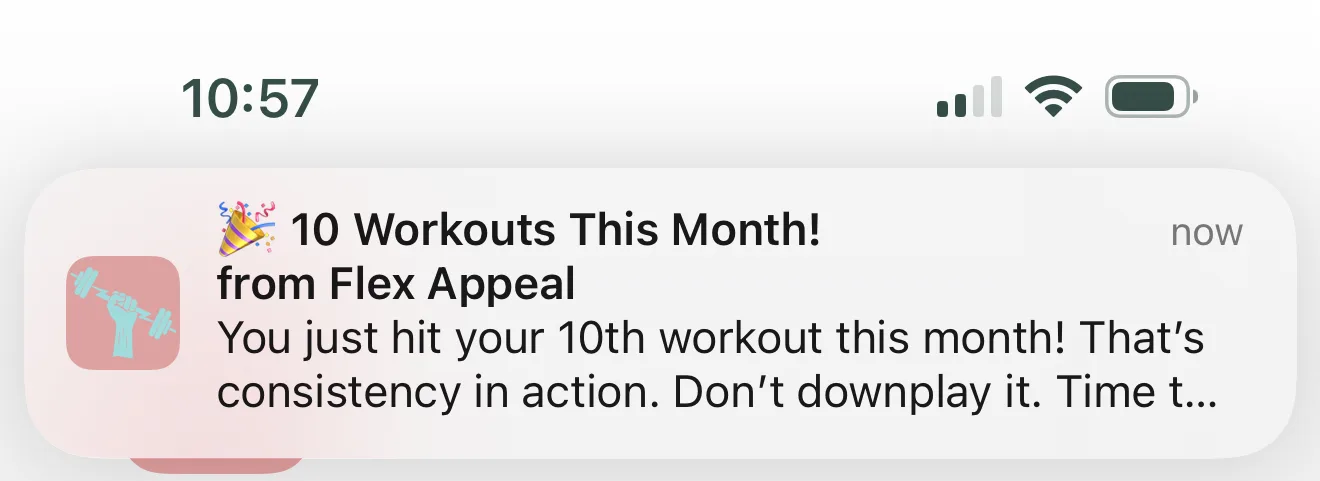
Longer messages may truncate on the device lock screen, with the full text waiting in the client's Notification Center. The push notifications guide covers the title and message limits, templates, and sending to groups.
Run a workflow for this client
If you have the Coach Workflows add-on, a 'Workflows' tile appears too. It opens a menu with 'Client Insight Report', 'Client Check-in' and 'View workflows', each set up for this client. Without the add-on the tile doesn't show. See all about Workflows.
Client plans
Click 'Create Plan' to start a new plan for this client. Building plans is its own topic, covered in the plan builder tour.
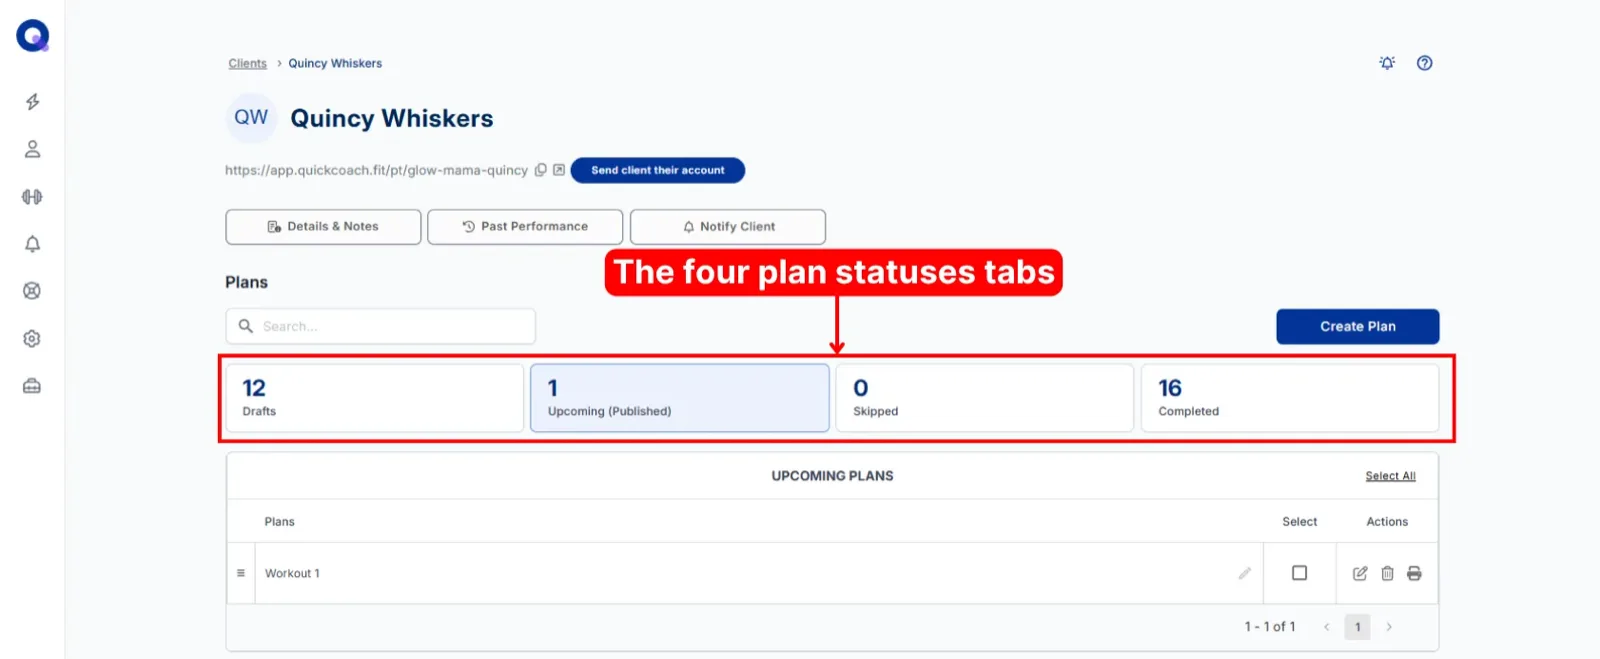
The 'Plans' search box searches whichever tab is highlighted. Plans sit in four status tabs, covered in more depth in seeing a client's plans by status:
- Drafts: plans you're still building. Clients can't see these yet.
- Upcoming (Published): plans your client has access to.
- Skipped: plans the client skipped. A skipped plan disappears from the client's app and they can't reopen it, but you can still open it here and reassign a copy.
- Completed: plans the client submitted, along with everything they logged. These can't be reopened.
Drafts and Upcoming plans
These two tabs share the same columns and buttons. 'Created' shows when you made the plan, 'Title' is its name, and 'Tasks' counts the tasks inside, including empty rows.
Drag the sandwich icon (the three stacked lines) up or down to rearrange plans. Reordering in Upcoming (Published) updates on your client's side automatically. Rearranging drafts is useful too; if you're editing a series of plans, putting them in order before publishing keeps things manageable.
The pencil icon renames a plan in place (type the new name, then click the save icon), so you don't have to open the plan just to fix a title. The edit icon opens the plan for full editing, and the trash icon deletes it after you confirm with 'Delete'.
Skipped and Completed plans
These tabs swap the 'Created' column for 'Skipped At' or 'Completed At', showing when the client skipped or submitted the plan.
Click the pencil icon to view a skipped or completed plan. You can't edit it, but you can see the plan details, what the client entered in each results box, any text or audio feedback they left, and their post-plan questionnaire answers if they filled it in.
Actions available in every tab
The printer icon exports any plan as a PDF for printing.
For bulk changes, tick the checkboxes in the 'Select' column. A row of icons appears in the table's header bar; hover over one to see its name. Not every icon shows on every tab: on Completed you only get Assign Selection and Copy Selection.
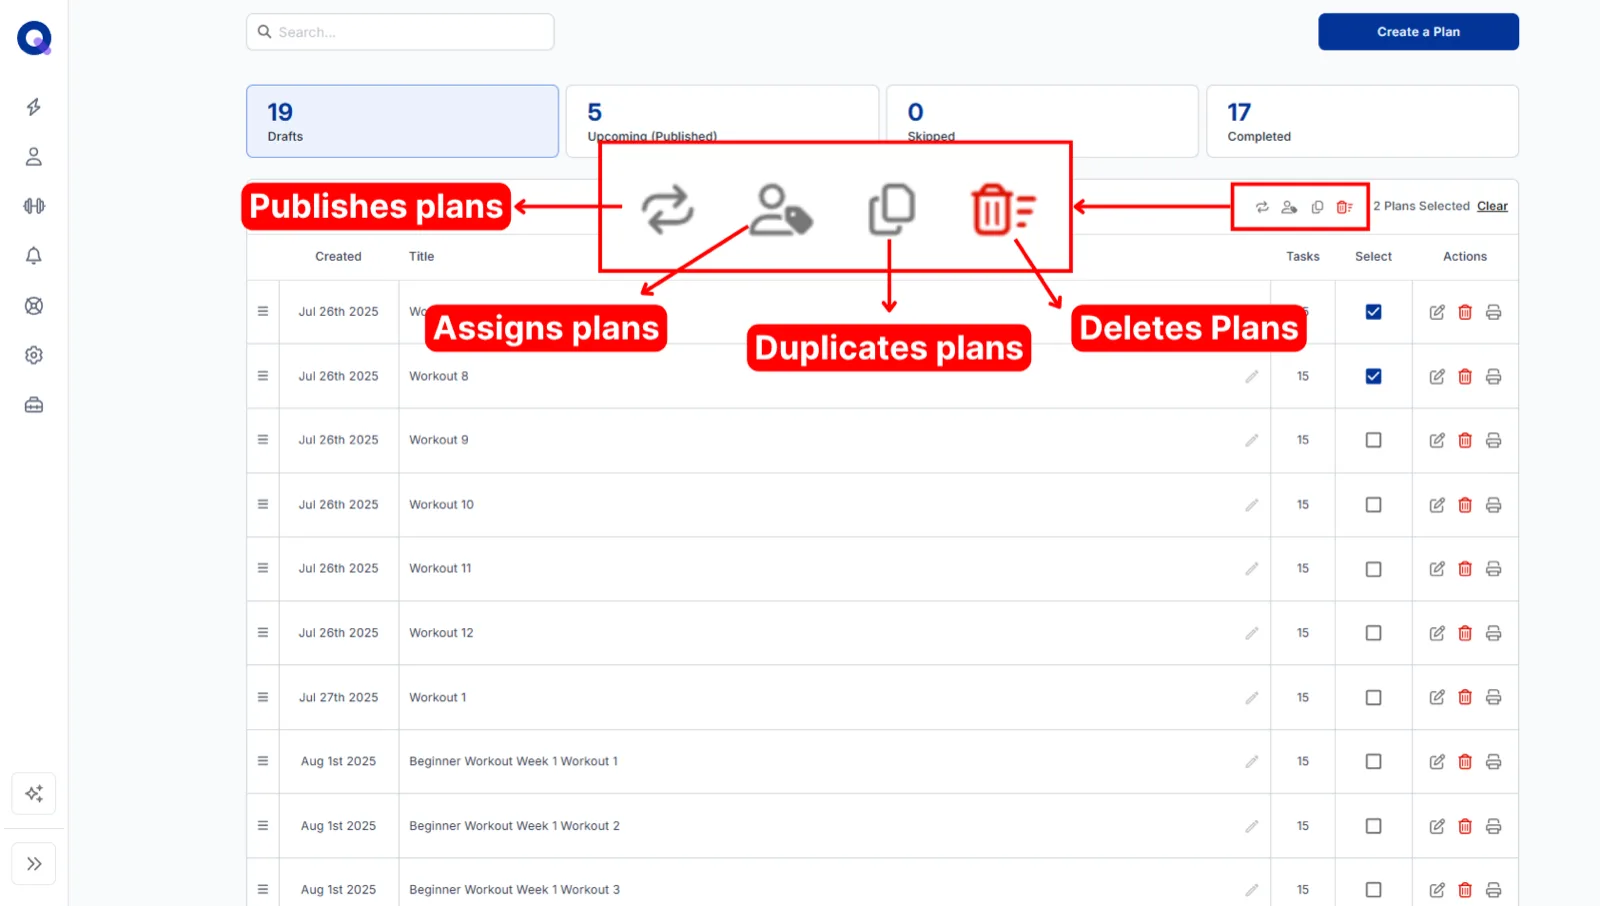
- Change Status (circling arrows, Drafts and Upcoming only): move the selected plans between Drafts and Upcoming (Published).
- Assign Selection (person icon): opens 'Assign Plan'. Pick clients, or Client Groups on Pro, choose Draft or Published, then click 'Assign to' followed by the number of clients.
- Copy Selection (duplicate icon): create a copy of the selected plans in this client's Drafts.
- Delete Selection (red trash icon, not on Completed): delete the selected plans, with a 'Delete' confirmation.
Managing a client's plans in bulk walks through each action with examples.
Review client feedback
All the feedback a client has ever left lives in one place under their plans, split across two tabs: 'Client Comments' and 'Survey Feedback'.
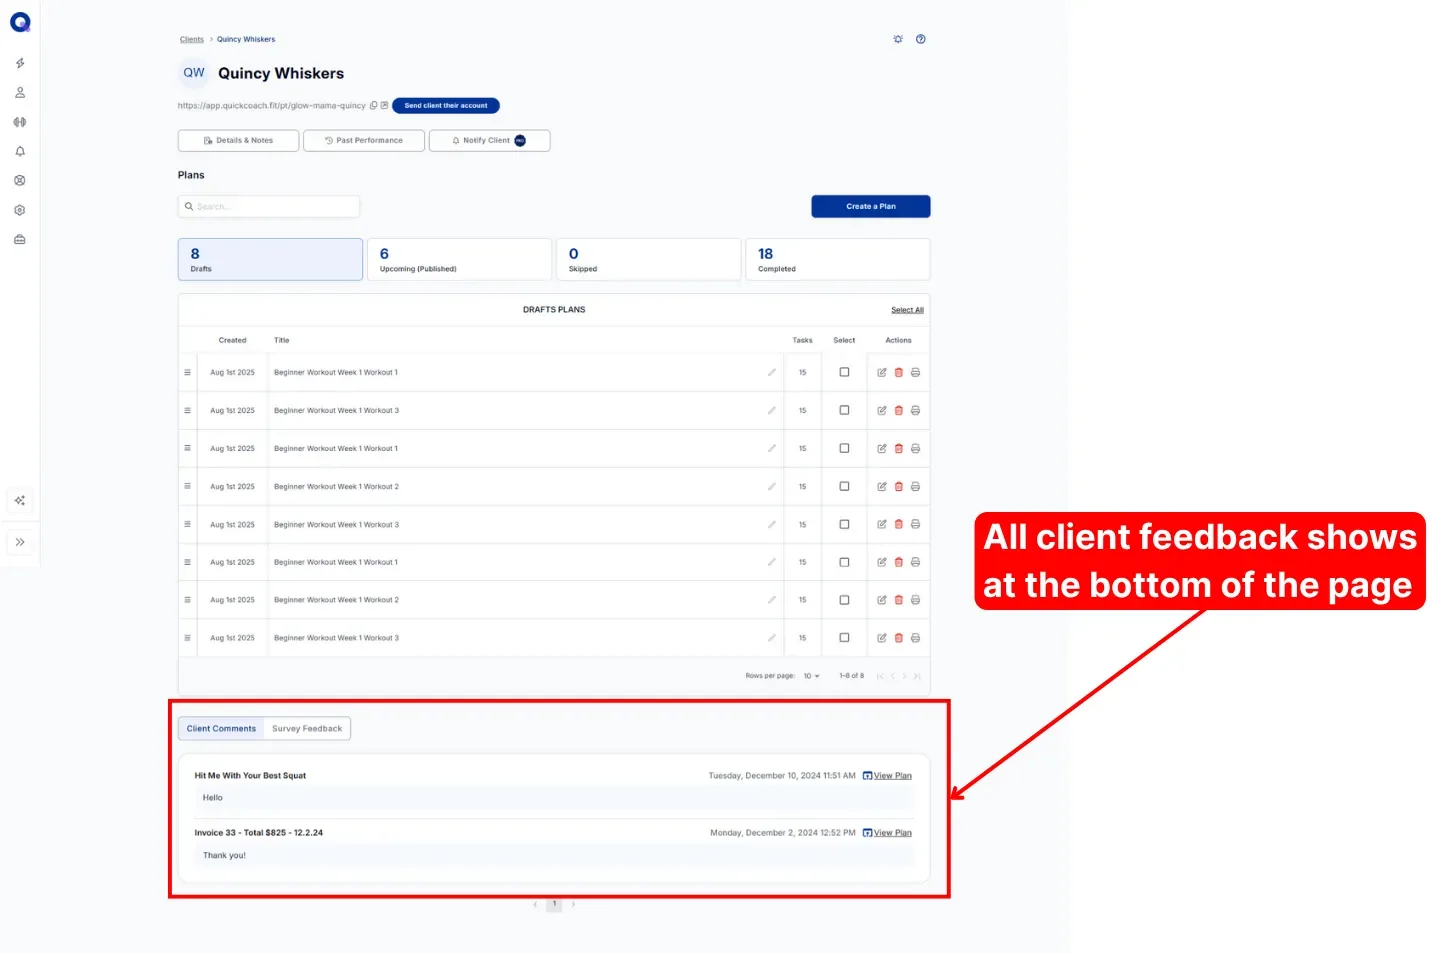
'Client Comments' collects every text and audio note the client left when submitting a plan, stamped with the date and time. Click 'View Plan' to open the completed plan the feedback belongs to.
Audio notes have a play button, a speaker icon for volume and mute, and a three-dot menu where you can download the note or change the playback speed.
The 'Survey Feedback' tab lists the client's post-plan survey responses, with each submission separated by a line. For every one you'll see the plan name in the top left, the date and time it was submitted, a 'View Plan' link, the questions asked, and the answers your client chose.
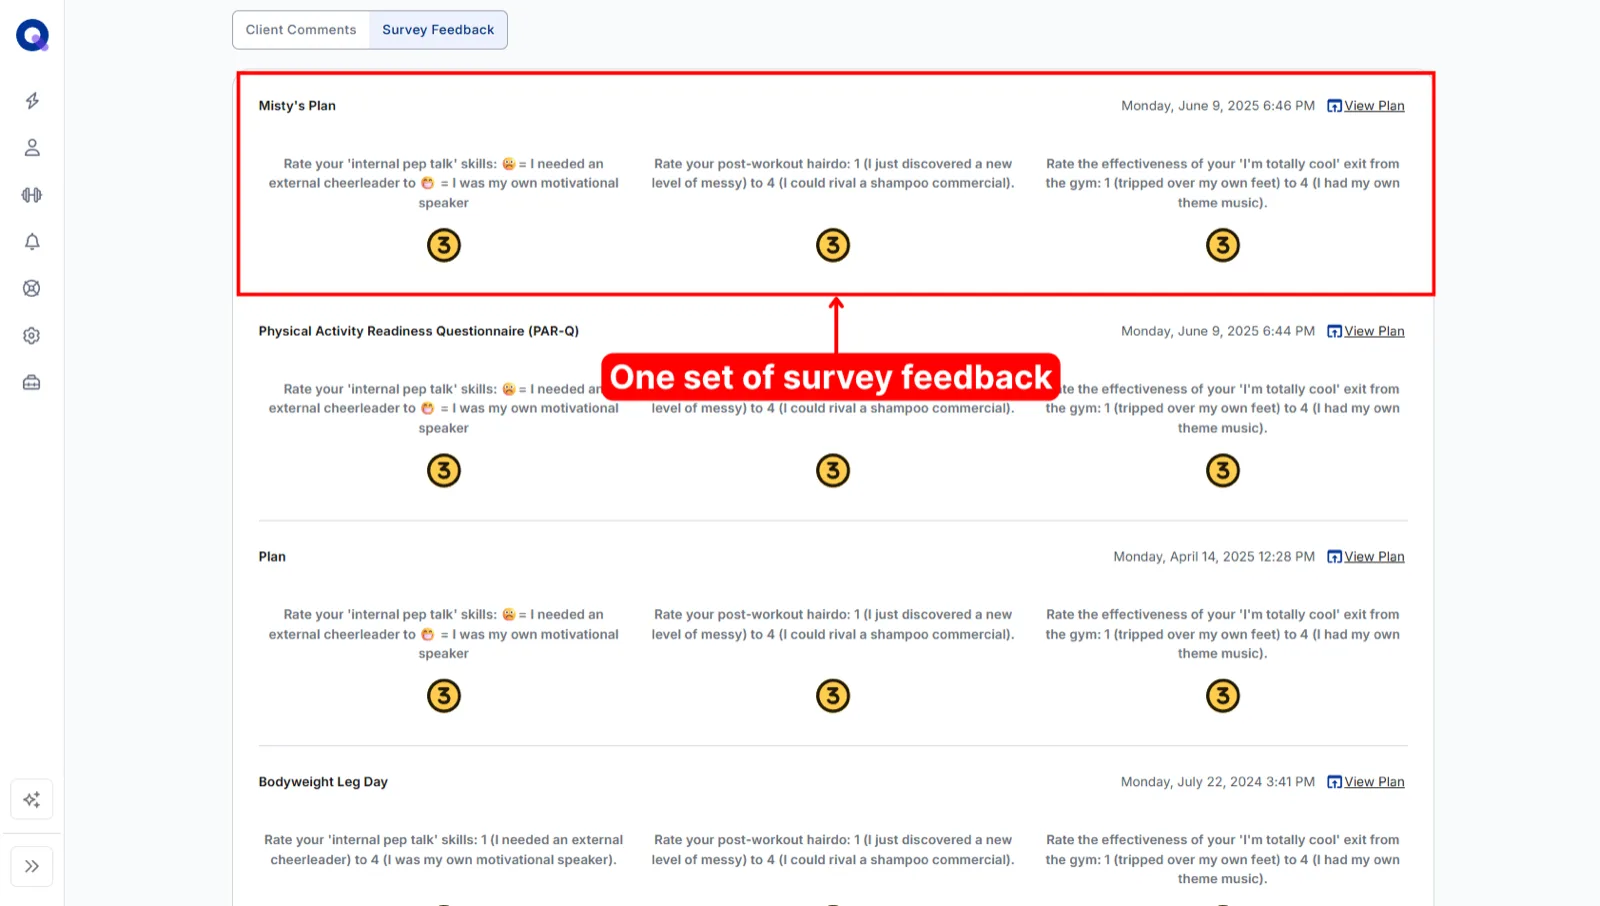
Responses display as numbers or emojis depending on your questionnaire settings. See setting up your post-plan survey to configure the questions, and seeing your client's feedback for every place feedback surfaces and the best ways to reply.
Frequently asked questions
Are the client notes under 'Profile and notes' private?
Yes. They're for your eyes only, and your client never sees them.
Do I need to email my clients their link every time they have new plans?
No. 'Send client their URL' only needs doing once. As long as your client has their link, they can reach their plans. To tell them something new is waiting, send a push notification instead.
Do I need to give my clients access to their account?
No. If you're only using QuickCoach to track in-person sessions, your clients never need access at all.
How can I respond to client comments?
There's no direct reply feature, but you have a few roundabout options. Send a one-way notification, add a note to the client's plan notes, or, for anything in-depth, create a task in their plan with text, a voice note, or a YouTube or Vimeo video you've uploaded. The reply patterns are covered in seeing your client's feedback, linked above.
Why isn't a task showing in my client's history?
Two things must be true for a task to appear there. The task must have been in your task library when you added it to the plan (look for the book icon next to it in the plan builder), and your client must have typed something in the results box. Empty results are filtered out.
Can I delete skipped or completed plans?
No. Skipped and completed plans can't be deleted.
What order do plans show up in for clients?
QuickCoach uses a 'What Comes Next' approach rather than a scheduling calendar. Clients simply do the plan at the top of their list, labelled 'Next Plan', so arrange their Upcoming plans in the order you want them done.
Will my client be notified when a new plan is added?
No, notifications are entirely under your control. New plans appear on the client's side in real time and wait for them there. If you want them to know, send a push notification.
If you haven't already, start with the Clients page to see how all your client accounts fit together in one roster.