
Build along: your first program template
A hands-on tutorial that walks you through building a real four week program template, from the first plan and its supersets to assigning it to a client.

This tutorial is for hands-on learners. Instead of touring every feature and leaving you to it, you'll build a complete program alongside me. You won't see every corner of the app, but by the end you'll know everything you need to build programs of your own.
Note: QuickCoach's features and screen layouts may change over time, but the core workflow stays the same.
If you'd rather understand the concepts before you start clicking, read the plan builder tour first, then come back here to get your reps in.
Here's what we're building: a program template called 4 Week Back In Action Program: 45 Minutes. It has three workouts a week for four weeks, so twelve plans in total. You'll build the three workouts once, then duplicate them.
Step 1: Create the program template
Think of a program template as a folder that holds a full program, like this four week one. You create it once, then assign it to one client or many without starting from scratch each time.
- Click Plans (the lightning bolt icon) in the navigation. This opens the Templates page, which has a Program Templates tab and a Plan Drafts tab.
- Click the Program Templates tab if it isn't already selected.
- Click + Create Template.
- Under 'Template name', type 4 Week Back In Action Program: 45 Minutes, then click Create template.
- Click the new template to open it.
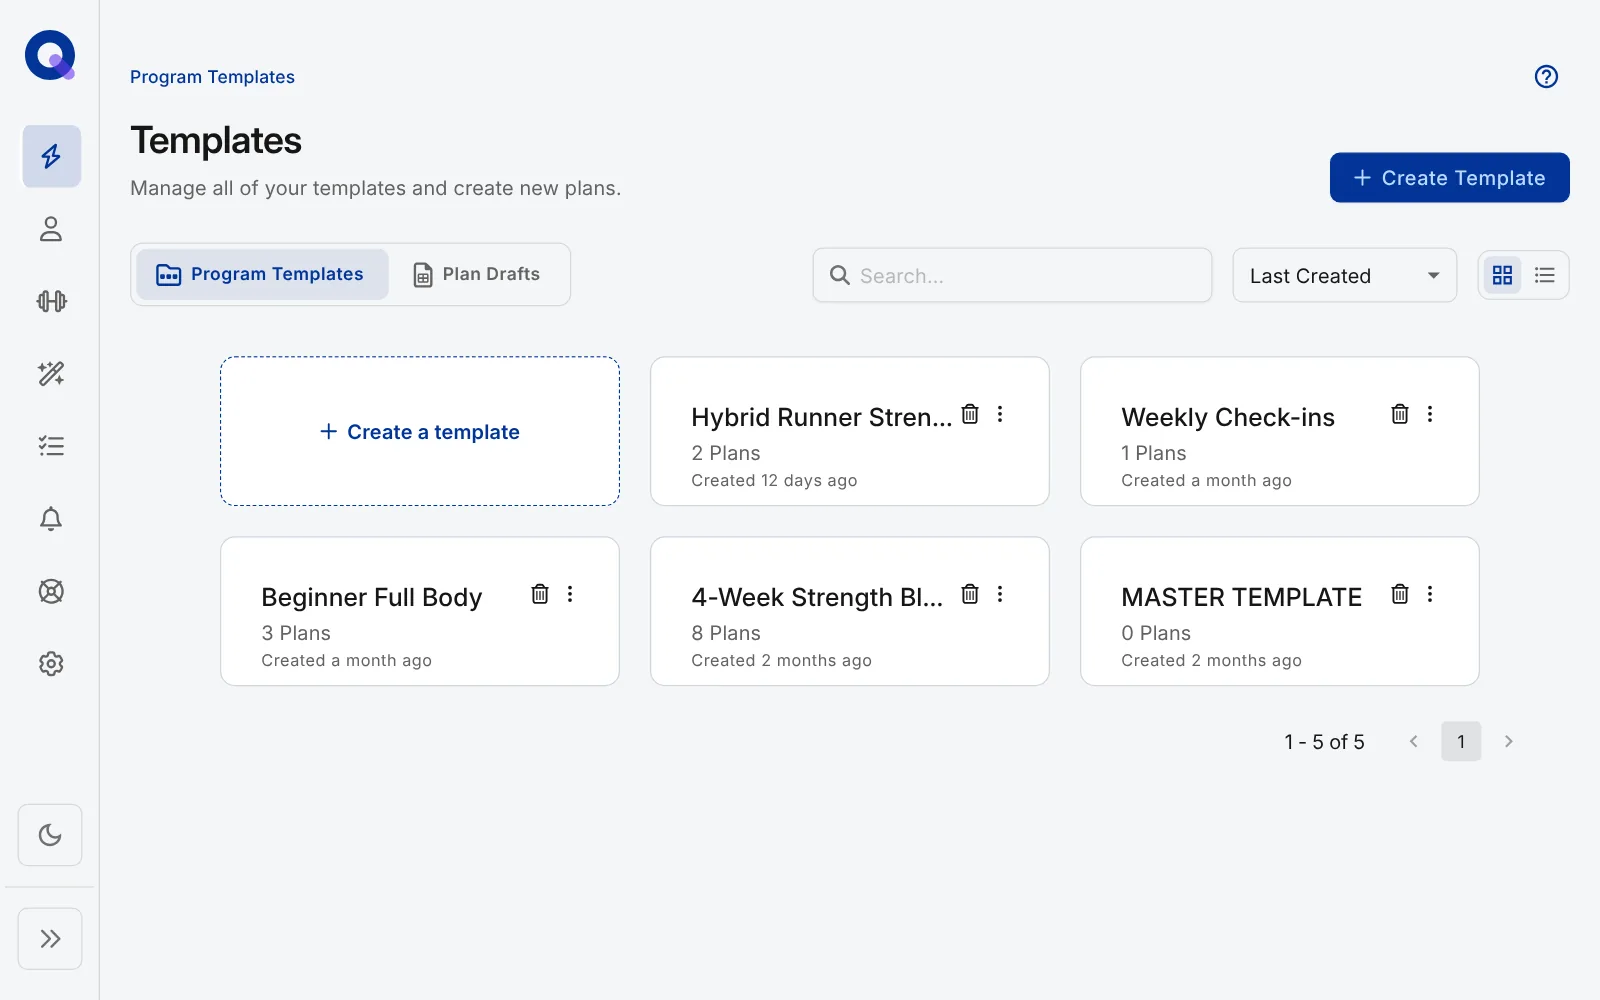
That's the template created. It looks a little sparse, so let's add some plans.
Step 2: Build Workout 1
A plan can be many things, but for now think of it as a single workout: one day's worth of tasks you want a client to complete.
Click Create a plan (any of the buttons works), type Workout 1 under 'Plan name', and click Create Plan. Don't worry about the other fields. You'll land in the plan builder, which is where the whole workout comes together. (There's a control-by-control reference in the plan builder tour if you ever want it.)
Set your plan variables
Variables are the names of the editable columns in the plan builder. They label the details attached to each task, and clients see them presented alongside every exercise. A plan can have up to six.
- Click Plan Variables to open the menu.
- Delete the text of the first variable and type Reps.
- Update the remaining labels to Sets, Weight, Time and Notes.
- Click the toggles next to 'Time' and 'Notes' to enable them.
- Click Apply Changes.
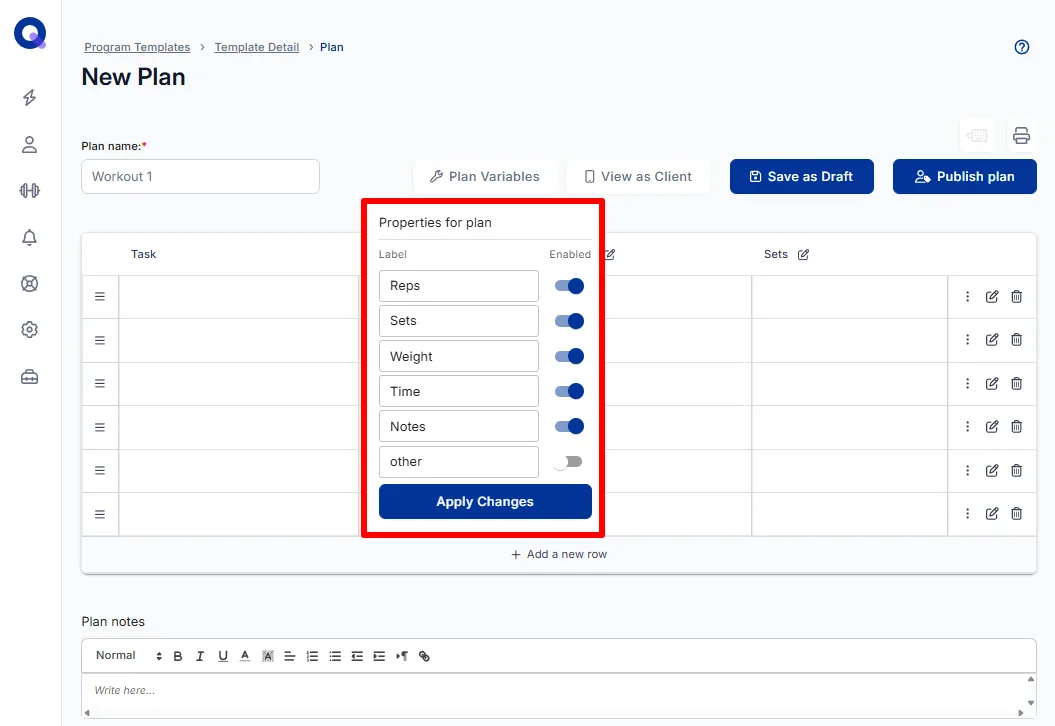
Tip: In the Plan Variables menu the labels run top to bottom. In the plan builder they appear left to right, in that same order.
Create your first heading
A heading creates a separate section in your client's plan. It gives the plan visual structure, and the colours match whatever you've chosen for your client app branding.
- In the first row, click the ⋮ icon to open the row menu.
- Click Create Heading. The cells of that row merge into one.
- Click inside the merged cell and type Warm-Up.
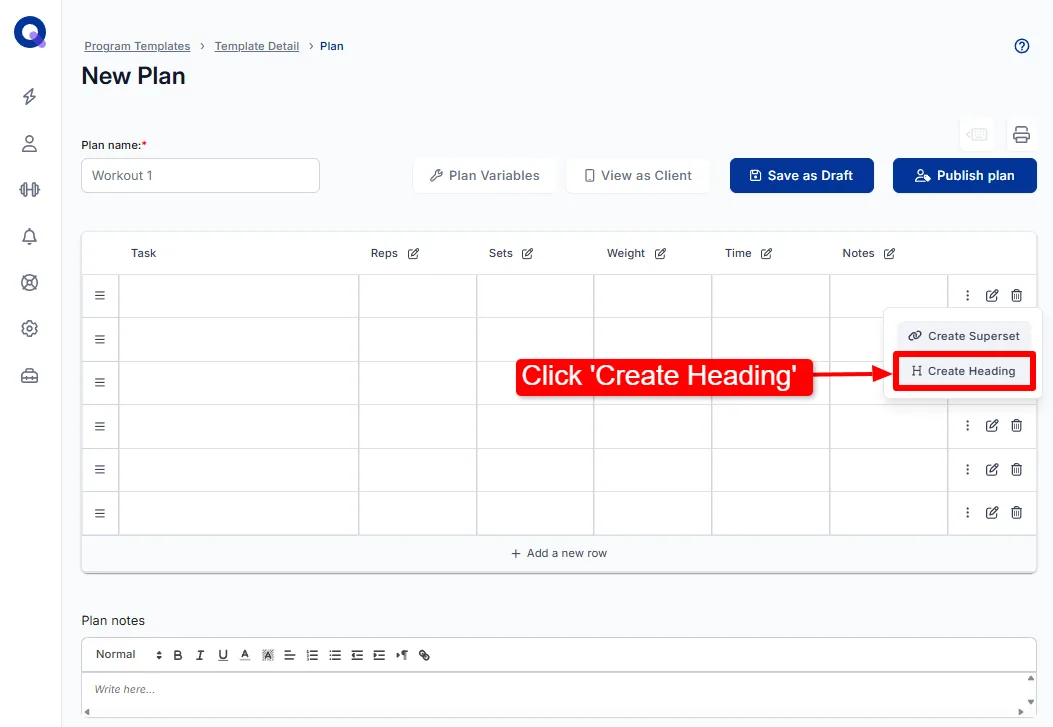
There's more on how headings behave in headings and supersets, but that's all you need for now.
Add your first task
A task can be lots of things. For this program, treat a task as an exercise.
- Click inside the first empty cell and type Arm Circles.
- Click Add "Arm Circles" to your library.
Important: Add a task to your library when you'll want to reuse it and track a client's history on it. That's the vast majority of tasks, so when in doubt, add it to the library.
Now give the task some detail. Click the pencil icon on the task to open its details, where you can add task notes, a video, and, on Pro, images or an audio note. For this exercise we'll add a video and notes.
- Paste this link into the video box: https://youtu.be/zwAxxNpMwCY, then click Update. The video thumbnail appears.
- Add short instructions to the 'Task Notes' box. For Arm Circles: stand tall with arms out to the sides at shoulder height, make small controlled circles moving forward and gradually widen them, then reverse direction after 30 seconds and circle backward for another 30 seconds.
- Click Complete.
Important: Build your tasks in full as you go. If you edit a task later, the changes only apply going forward. Plans already using that task won't update.
Your task now shows three icons: one for the video, one for the text notes, and a bookmark showing it's in your task library. Finish the row by filling in the variables: under 'Sets' add 1, and under 'Time' add 30 seconds each direction.
Want to see what your client will get? Click View as Client for a preview, then close it with the X.
Your turn: finish the warm-up
Add the other two warm-up exercises the same way (both are in the Workout 1 table below), then create a second heading called Main Workout. You've done each of these steps once already.
Create the supersets
The main workout uses two supersets. A superset is a group of exercises done back to back.
- Click the ⋮ icon on an empty row and click Create Superset. The row gains a purple band, which marks every task inside it as part of the superset.
- Click the pencil icon on the band, type Superset 1 (repeat 3x), and press Enter to save the name.
- Add the first exercise, Goblet Squats, inside the superset.
- Click the + icon on the superset to add a second row inside it, then add Incline Push Ups.
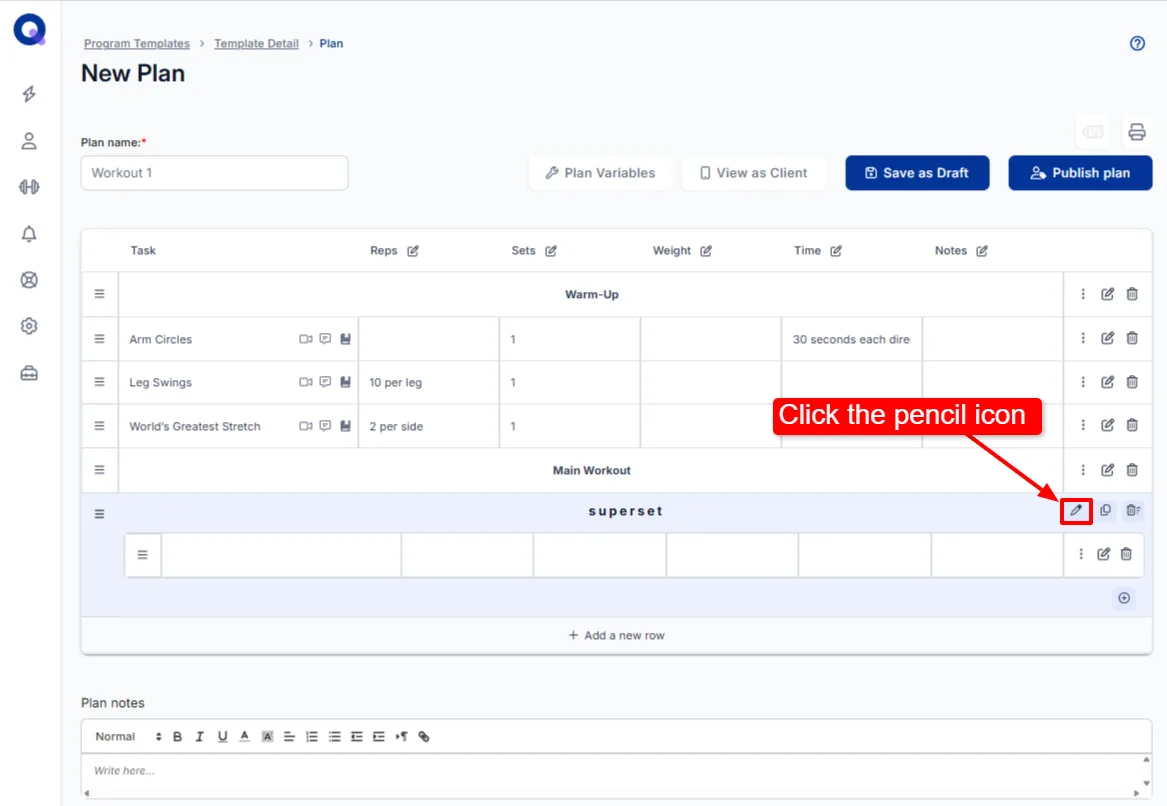
Build Superset 2 (repeat 3x) the same way with the two exercises from the table below. Need a plain row outside a superset? Click + Add a new row at the bottom of the plan. That's the whole trick.
Finish the workout and publish
Add a Cool Down heading and its three stretches from the table below. Then add plan notes. Plan notes appear at the top of a client's plan, so they're the place for anything the client should know before starting. For Workout 1: "Welcome to your workout! You'll need dumbbells (12 lb and 15 lb), a bench or chair for stretching, and optionally a yoga mat."
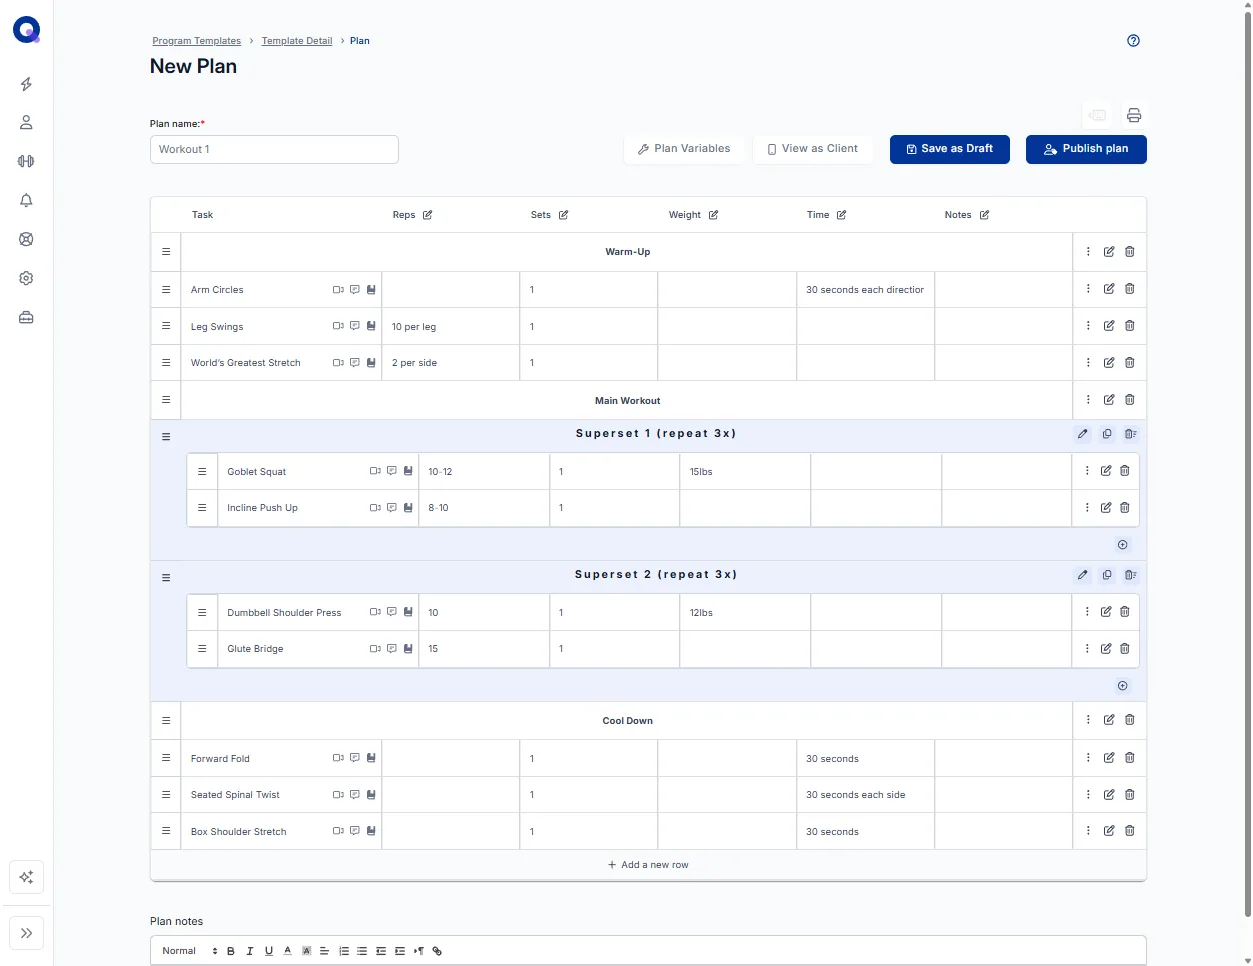
Click Publish plan at the top right. You'll be brought back to your program template, and Workout 1 now sits in the 'Ready Plans' section.
The full three workout split
Workouts 2 and 3 follow exactly the same structure, so they're your practice ground. Each exercise name below links to its demo video. Paste the link into the task's video box, add your own short form cues to the task notes, and fill in the variables shown.
Workout 1
| Exercise | Sets and reps |
|---|---|
| Warm-Up | |
| Arm Circles | 1 set, 30 seconds each direction |
| Leg Swings | 1 set, 10 reps per leg |
| World's Greatest Stretch | 1 set, 2 reps per side |
| Main Workout: Superset 1 (repeat 3x) | |
| Goblet Squats | 10-12 reps, 15 lb |
| Incline Push Ups | 8-10 reps |
| Main Workout: Superset 2 (repeat 3x) | |
| Dumbbell Shoulder Press | 10 reps, 12 lb |
| Glute Bridge | 15 reps |
| Cool Down | |
| Forward Fold | Hold 30 seconds |
| Seated Spinal Twist | 30 seconds per side |
| Box Shoulder Stretch | 30 seconds |
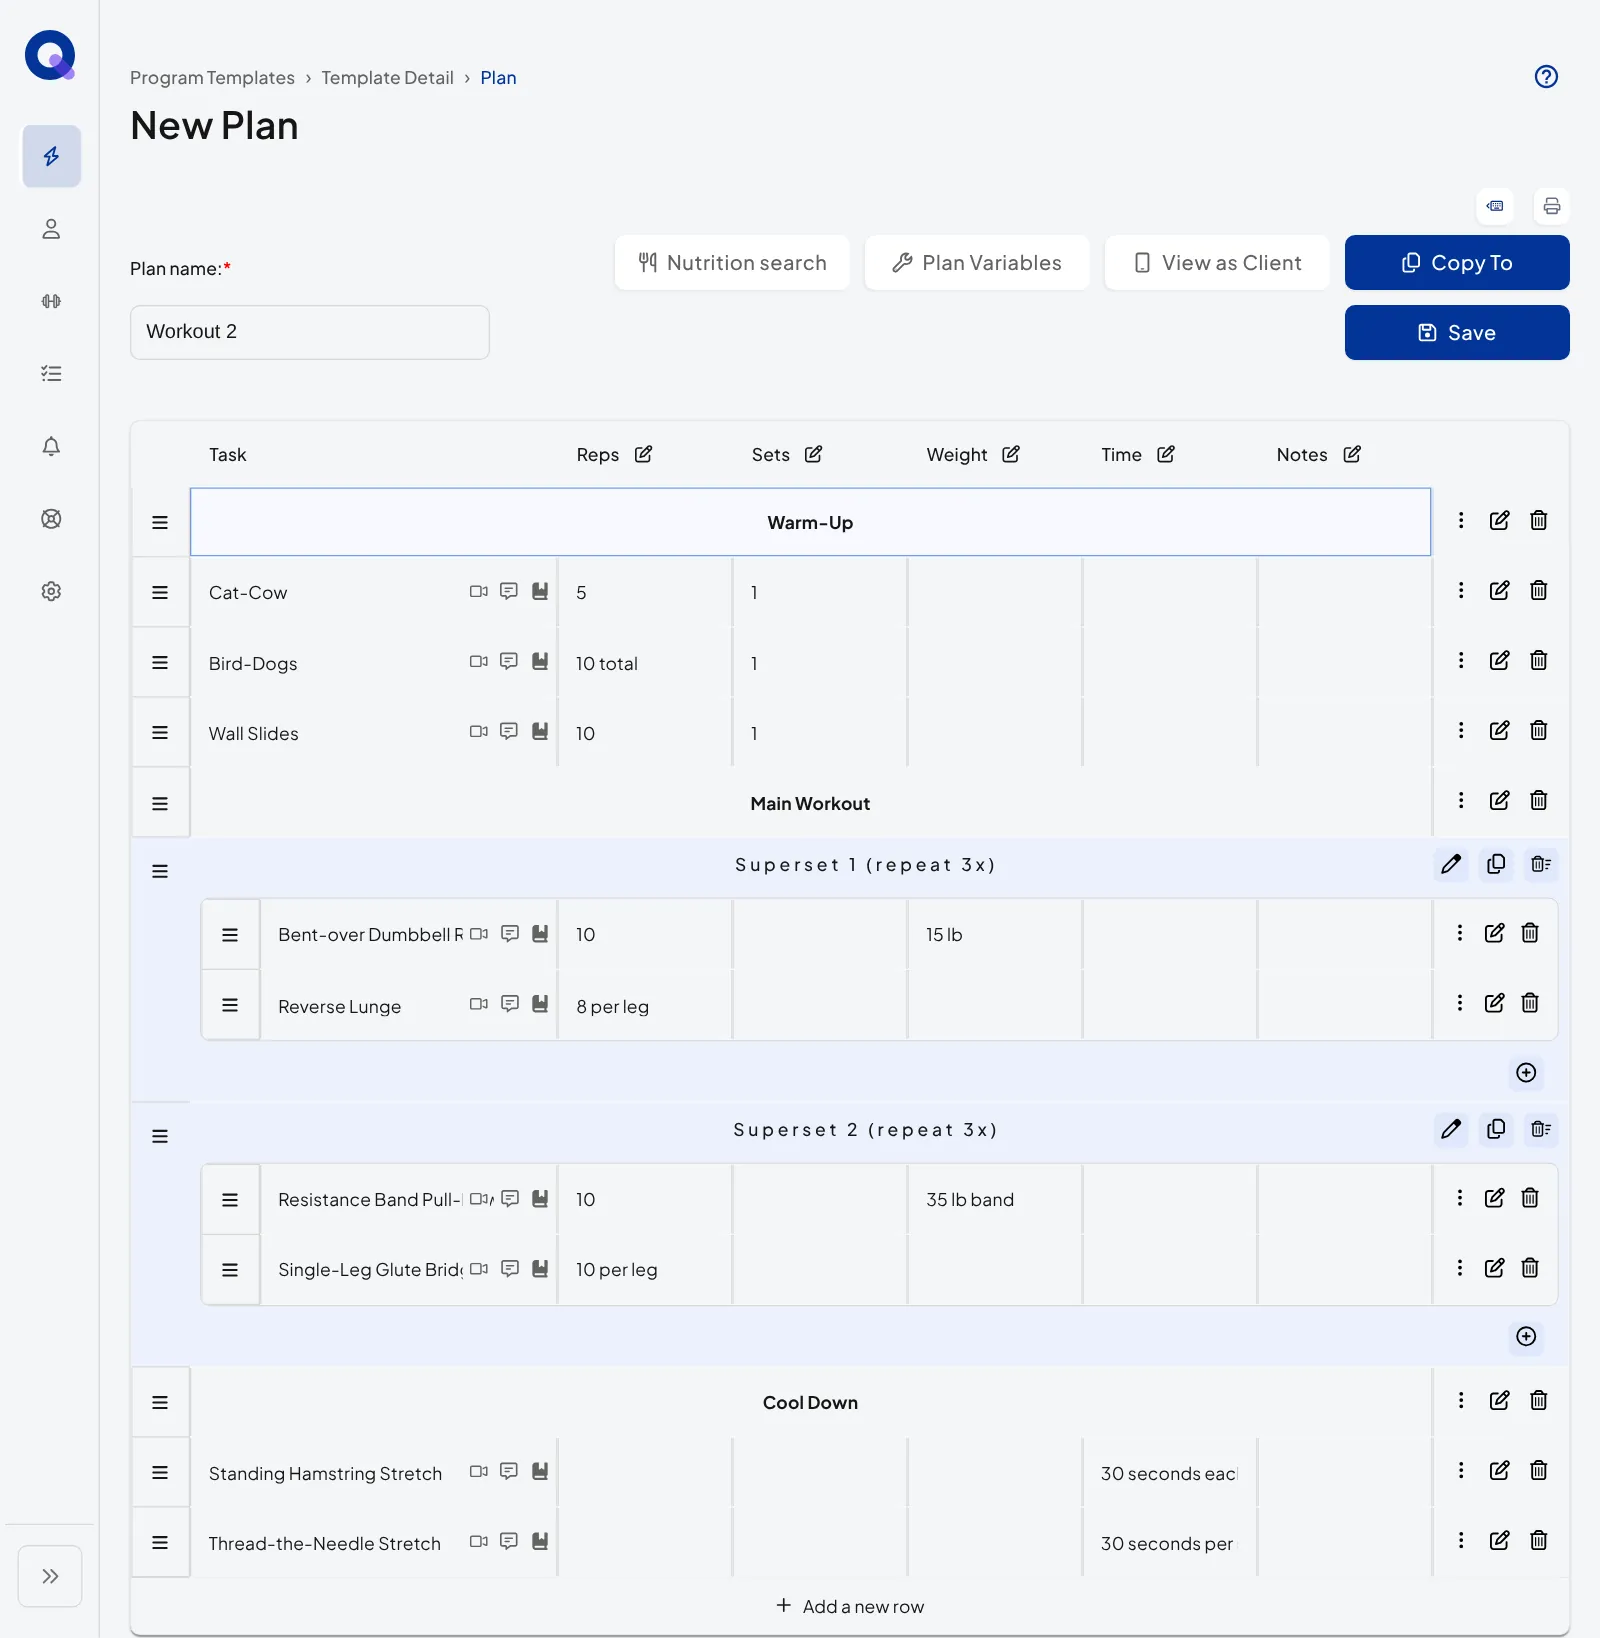
Workout 2
| Exercise | Sets and reps |
|---|---|
| Warm-Up | |
| Cat-Cow | 1 set, 5 reps |
| Bird-Dogs | 1 set, 10 total |
| Wall Slides | 1 set, 10 reps |
| Main Workout: Superset 1 (repeat 3x) | |
| Bent-over Dumbbell Row | 10 reps, 15 lb |
| Reverse Lunge | 8 reps per leg |
| Main Workout: Superset 2 (repeat 3x) | |
| Resistance Band Pull-Down | 10 reps, 35 lb band |
| Single-Leg Glute Bridge | 10 reps per leg |
| Cool Down | |
| Standing Hamstring Stretch | 30 seconds each leg |
| Thread-the-Needle Stretch | 30 seconds per side |
Workout 3
| Exercise | Sets and reps |
|---|---|
| Warm-Up | |
| Glute Bridge | 1 set, 10 reps |
| Side Lunges | 1 set, 5 per side |
| Jumping Jacks | 1 minute |
| Main Workout: Superset 1 (repeat 3x) | |
| Dumbbell Romanian Deadlifts | 10 reps, 30 lb |
| Lateral Step-Ups | 8 per leg |
| Main Workout: Superset 2 (repeat 3x) | |
| Bodyweight Bulgarian Split Squat | 8 per leg |
| Hollow Body Hold | 20 seconds |
| Cool Down | |
| Figure-4 Stretch | 30 seconds per side |
| Standing Quad Stretch | 30 seconds per leg |
Give Workouts 2 and 3 a plan note listing their kit too. Across the program the client needs dumbbells, a resistance band, a bench or chair, and an optional exercise mat. Publish each workout when it's done.
Step 3: Duplicate plans for the full four weeks
Once a client submits a plan, it's finished. It can't be reopened or reused. So if a client should perform a workout four times, you need four copies of that plan. Our client repeats the same three workouts for four weeks, which means twelve plans.
- In the template's 'Ready Plans' section, click Select All to select your three published plans, then click the Copy Selection icon (hover over the icons above the list to see their names). The copies land in the 'Draft Plans' section, on the assumption you might want to edit them before they're assignable.
- Repeat the duplication until you have nine drafts alongside the three ready plans, twelve in total.
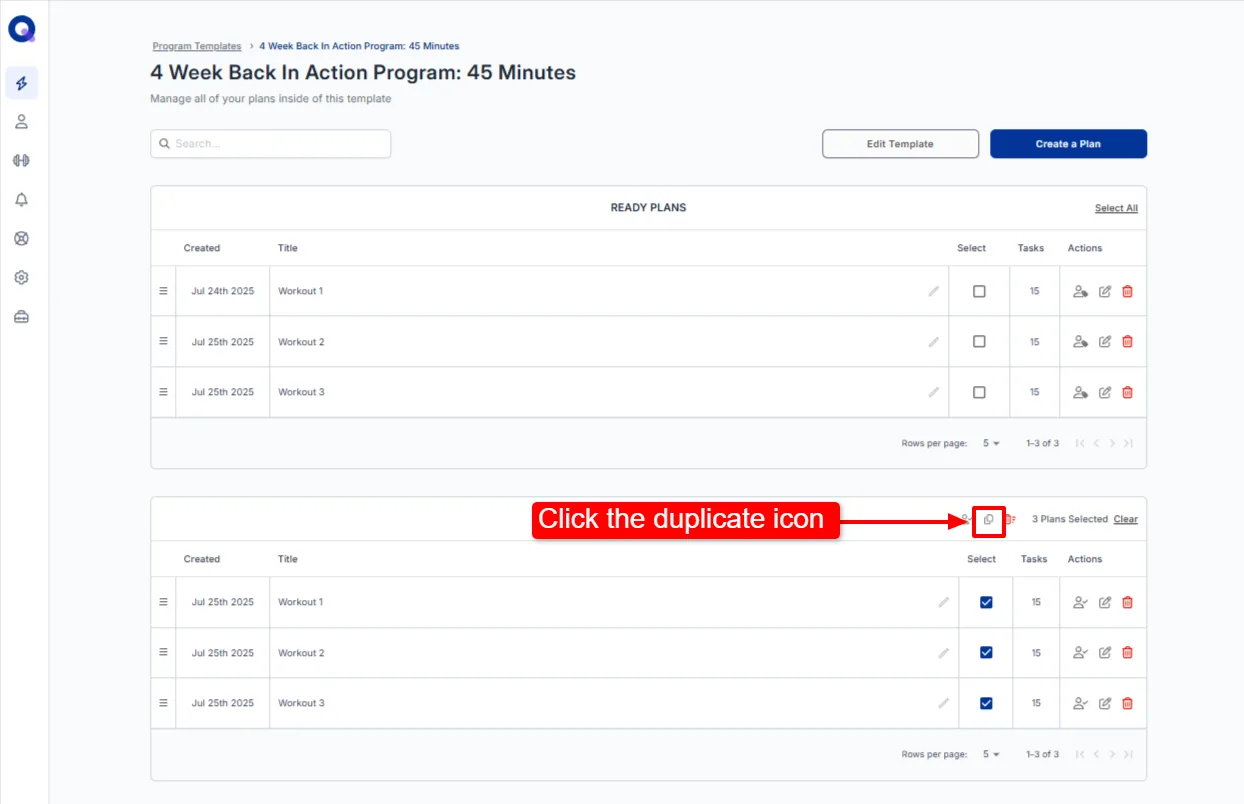
Tip: If you can't see all your drafts, change 'Rows per page' to 20 using the dropdown below the list. That keeps everything on one page.
Every copy is still called Workout 1, 2 or 3, so rename them before publishing. Click the pencil icon next to a plan's name (Edit Name), update it, and click the save icon (Save). The first copy of Workout 1 starts week two, so it becomes Workout 4. Carry on until the plans run from Workout 1 through Workout 12.
Finally, click Select All in 'Draft Plans' and click the Publish Selection icon (a person with a tick) to move the drafts to 'Ready Plans'. All twelve plans are now ready to assign, over and over. If you want more depth on duplication itself, see making copies of plans.
Step 4: Assign your program template
QuickCoach automatically creates a client for you when you open your account, listed under your own name. That's a safe place to assign this template as a test. There are two ways to assign, and the right one depends on whether the program needs edits first.
Option 1: Assign it as-is
Use this when nothing needs to change before the client gets access.
- On the Program Templates page, switch to list view with the view toggle next to the sort menu.
- Click the ⋮ icon on your template's row to open its menu, then click Assign to Client.
- In the Assign Template window, search for your client and pick them.
- Click Assign. Once you've picked someone, the button shows the count, such as "Assign to 1 client".
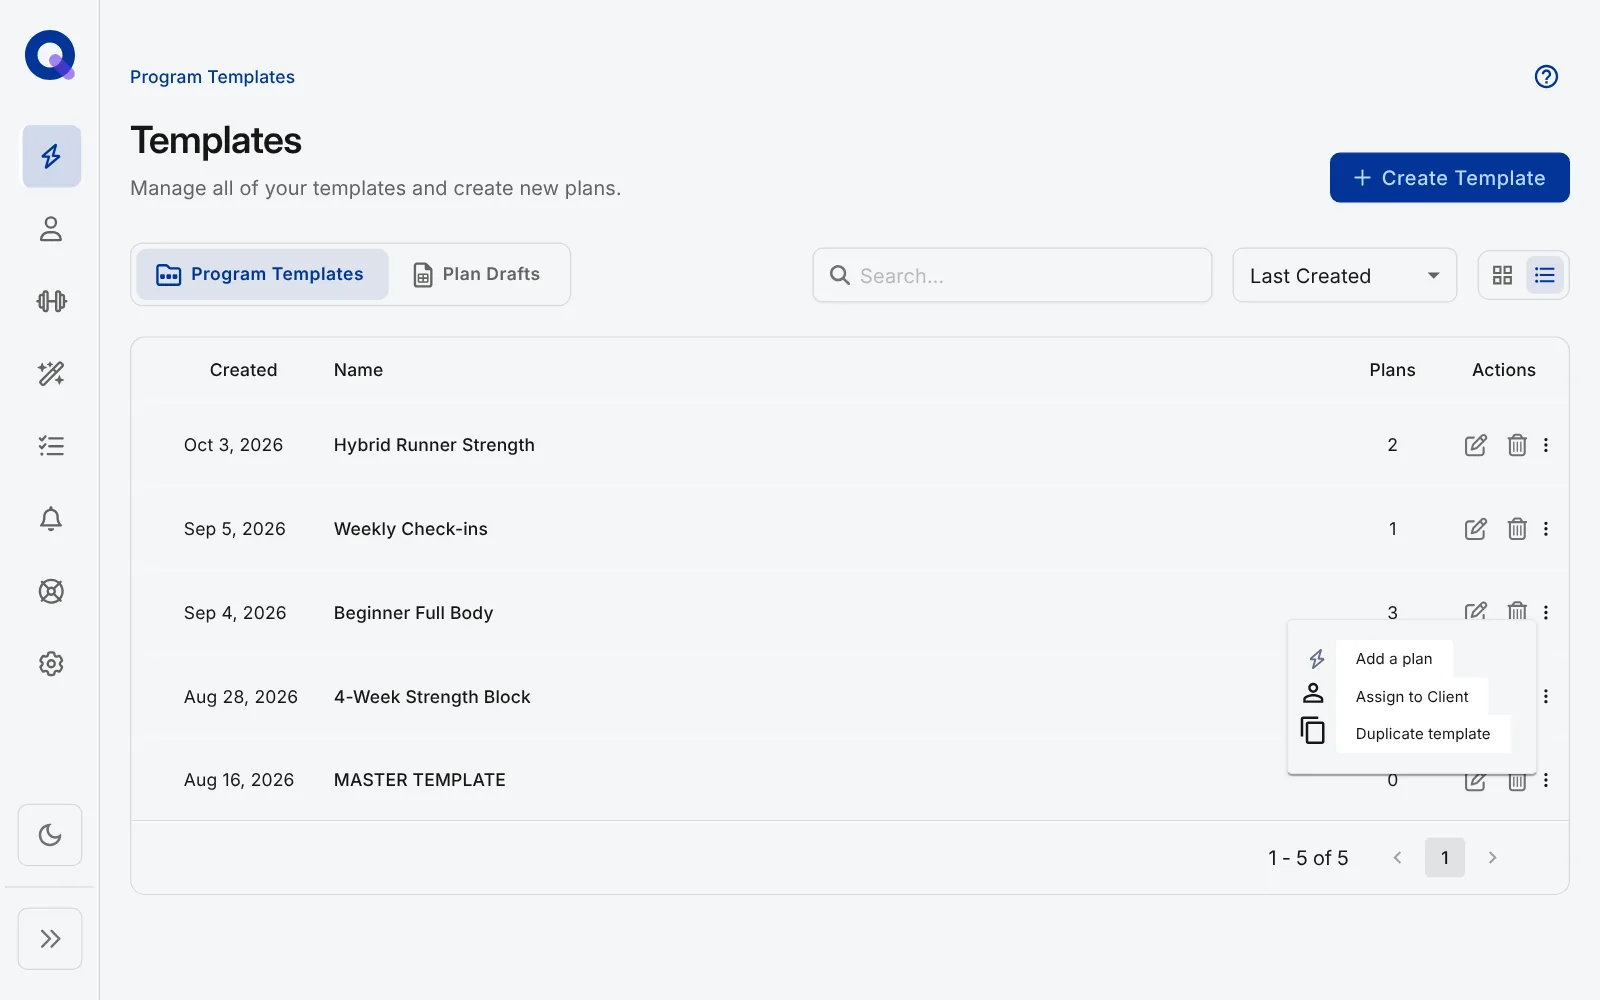
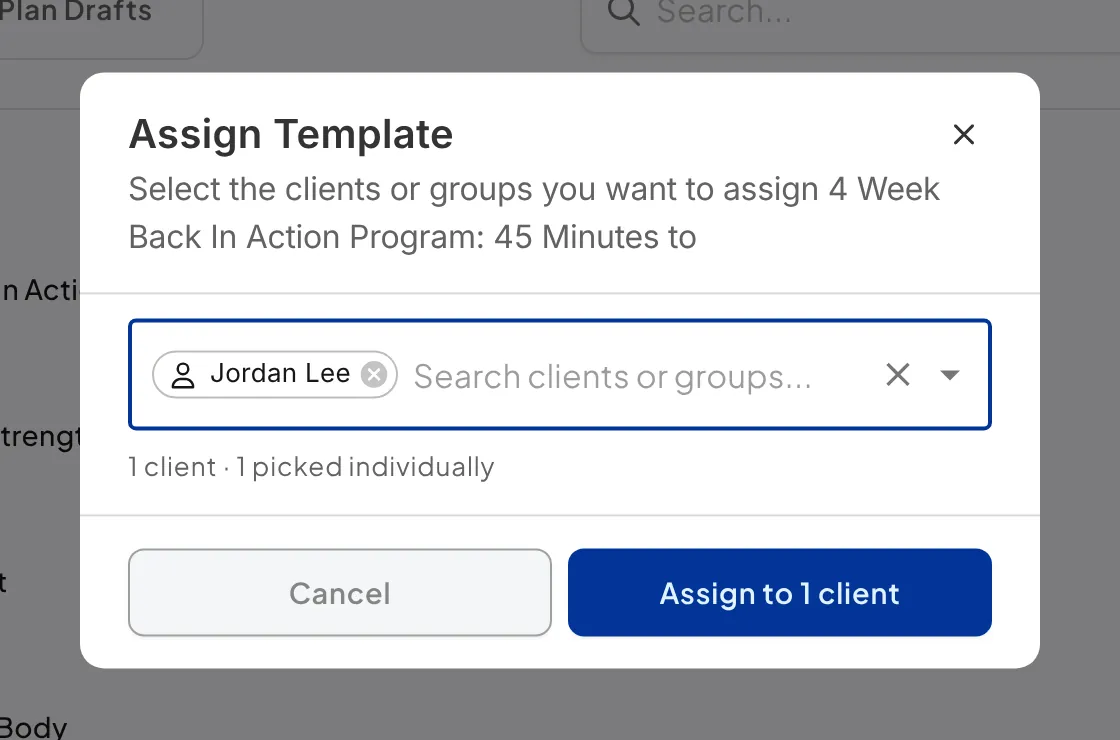
Assigning a whole template publishes its 'Ready Plans' straight into the client's 'Upcoming (Published)' tab, available to them immediately. There's no draft option for a whole template, and anything still in 'Draft Plans' stays behind.
Option 2: Assign it into drafts for client-specific edits
Use this when the program needs tailoring before the client sees it.
- Inside the program template, click Select All in 'Ready Plans' (or tick the plans you want to assign).
- Click the Assign Selection icon. The Assign Plan window opens.
- Search for your client and pick them. Leave Plan status on Draft (the default), then click Assign to 1 client.
- The plans land in that client's 'Drafts' tab, which clients can't see. Edit any plan with the pencil icon, and click Save as Draft when you finish so it stays hidden.
- When everything's ready, click Select All in the client's Drafts and click the Change Status icon. The plans move to 'Upcoming (Published)' and the client has them.
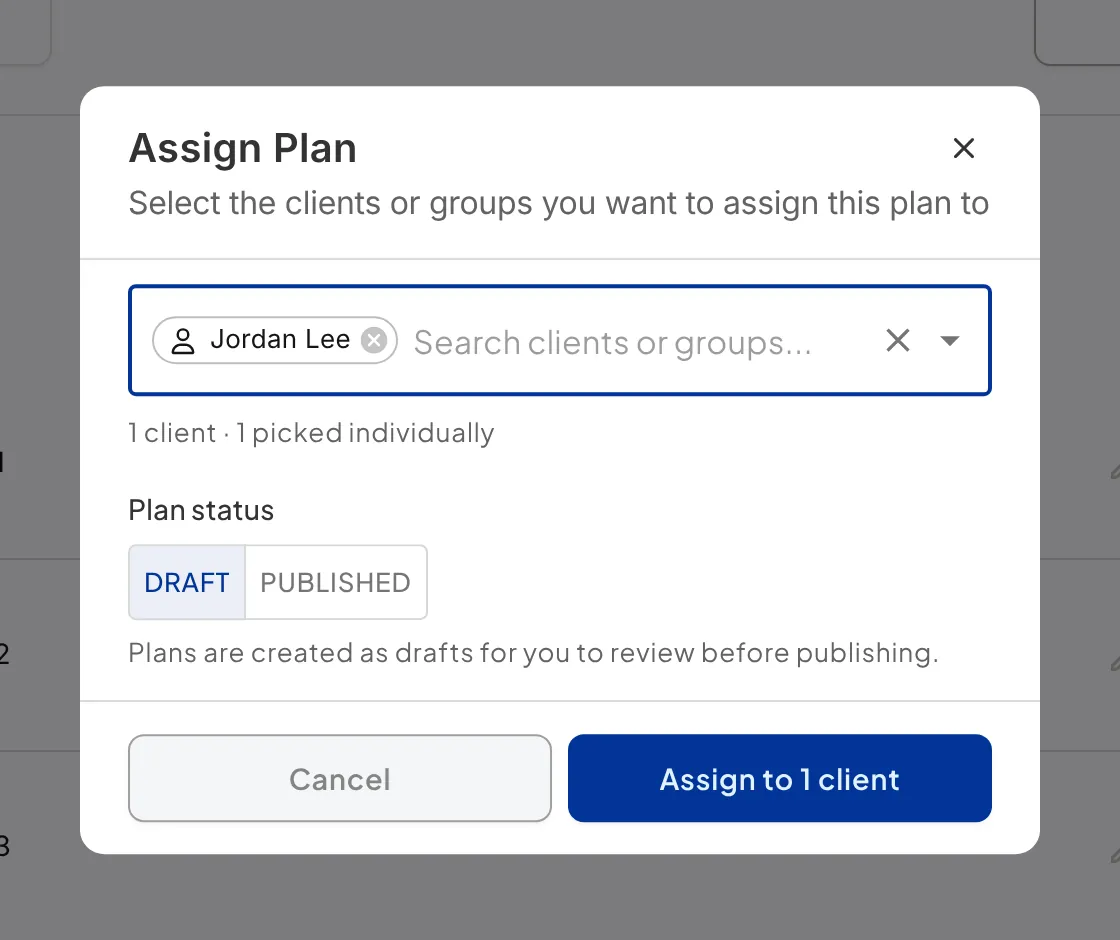
If you pick Published under Plan status instead, the plans skip the client's Drafts and go live straight away.
There's a fuller walkthrough of both routes in assigning plans to clients.
Repeating weeks in a multi-week program
This tutorial repeats the same three workouts for four weeks. Most real programs repeat a week's sessions with small changes, and the same build covers that. QuickCoach has no scheduling calendar, so the order of the plans is the schedule. Naming each plan by week and day (Week 1 Day 1, Week 1 Day 2) is how you and your client keep track.
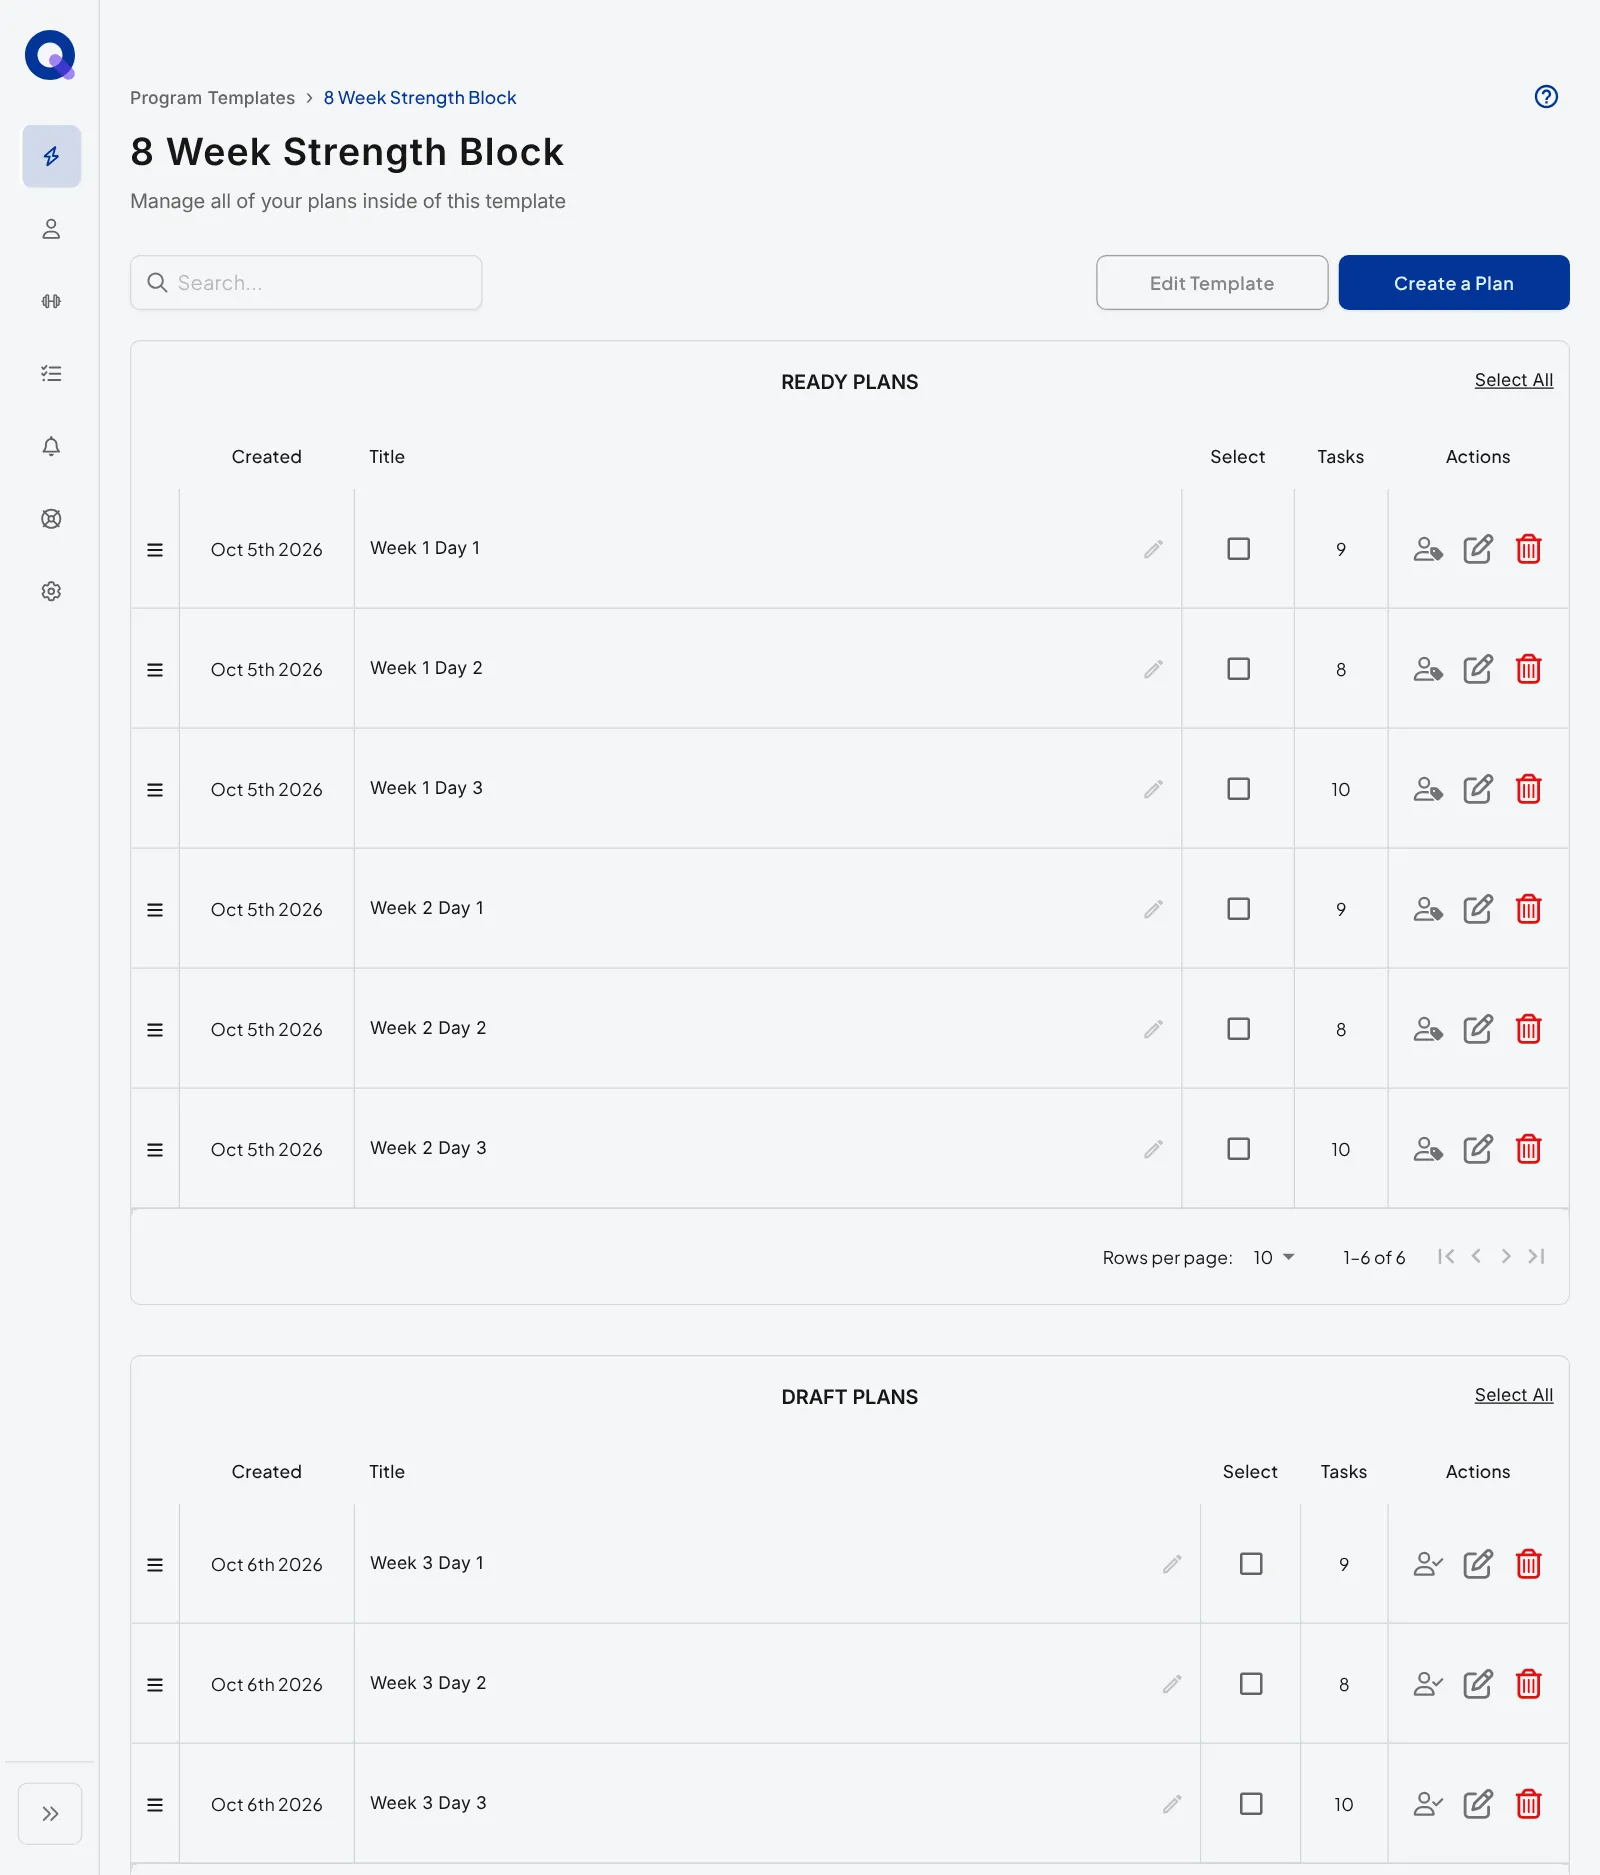
Progress each week before you publish
After you copy and rename a week, open each draft with the edit icon and change only what moves: the weight, sets or RPE on a handful of tasks. Everything else stays identical to week one. Click Publish plan when a draft is done and it moves to 'Ready Plans'. The quickest builds put all the headings, supersets and task notes in place in week one, so later weeks are just number changes.
Reorder plans after assigning
Plans arrive in the order they sit in the template, but you can still change it on the client's side. Open the client's 'Upcoming (Published)' tab and drag plans by the handle on each row. The client sees the new order straight away. See seeing a client's plans by status for the walkthrough.
Reuse the template with the next client
Assigning always creates a copy, so your template stays untouched. To run the same program with the next client, assign it again. All twelve plans are still waiting in 'Ready Plans'.
Frequently asked questions
Why isn't there a calendar?
QuickCoach works on a "what comes next" basis. Clients rearrange their training weeks constantly, and a fixed calendar turns every rearrangement into admin for you. Instead, the client opens the next plan on whatever day they train.
How do I create structure without a calendar?
Use plan names, for example Week 1 - Workout 1, Week 1 - Workout 2 and so on. If a client genuinely wants scheduled sessions, have them use the calendar they already live in. An existing calendar always beats a new one.
If I update my program template, does it update for clients I've already assigned it to?
Not at this time. Assigned plans are independent copies. Retroactive updates are on the roadmap.
What's the difference between 'Ready Plans' and 'Draft Plans'?
Plans in 'Draft Plans' are not included when you assign the program template. Only ready plans go out.
How do I reorder plans inside a template?
Drag the plan by its handle (the three lines at the left of its row) to the spot you want.
What if a client needs to repeat the same week twice?
Copy that week's plans one more time and name the copies to match, for example Week 2 Repeat - Workout 1. A submitted plan can't be reopened or reused, so a repeat always means a fresh copy.
Can I copy a plan to a different template or client?
Yes. Open a published plan and click Copy To in the plan builder. The Copy Plan To window lets you pick clients, templates or both. Click Publish and the copy arrives ready: in 'Ready Plans' for a template, or in 'Upcoming (Published)' for a client. Copying, duplicating and repeating plans covers every route.
That's the whole build. When you're ready to run the program with a real person, invite your first client and assign this template to them.
Template built? Order and publish plans in a Program Template covers getting the sequence right before you send it to more clients.